Welcome to Moda Fabrics!
When Life is Scrappy Quilt
When Life is Scrappy Quilt
Published:
Jun 21 2016 - 23:00


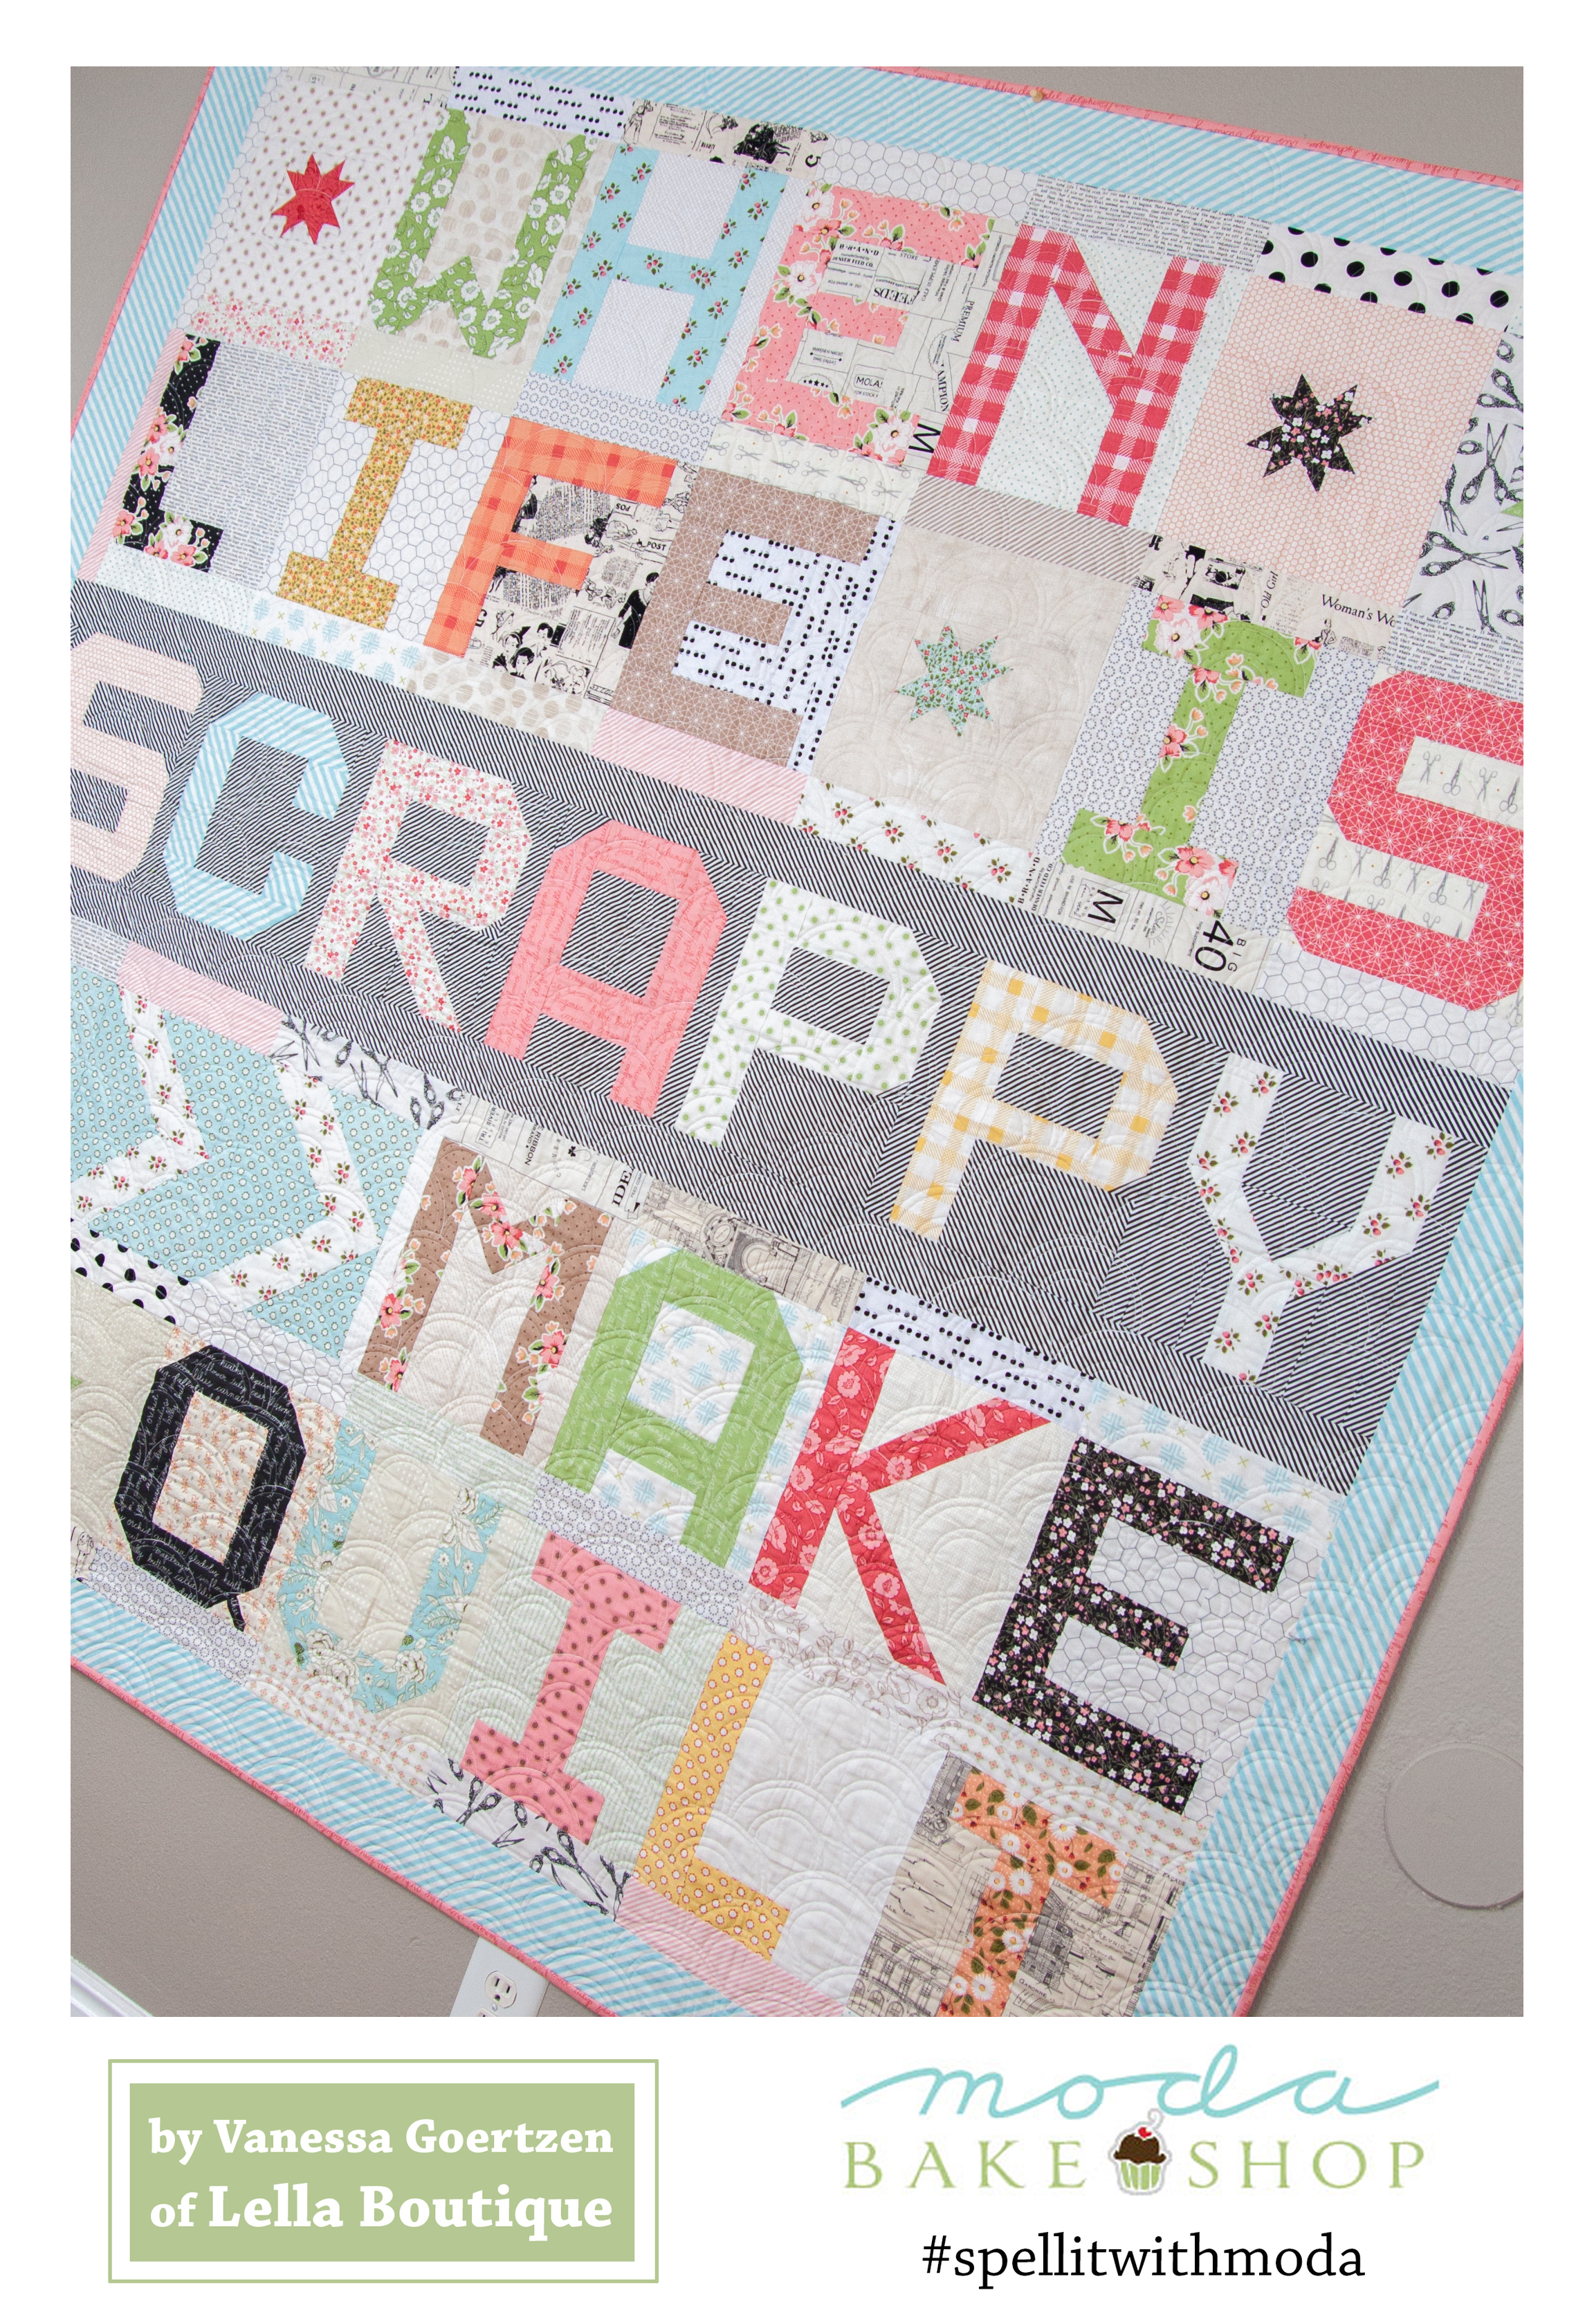
Calling all scrappy quilt lovers! This is Vanessa from Lella Boutique and I'm sharing a little about my Spell It With Moda quilt today :)

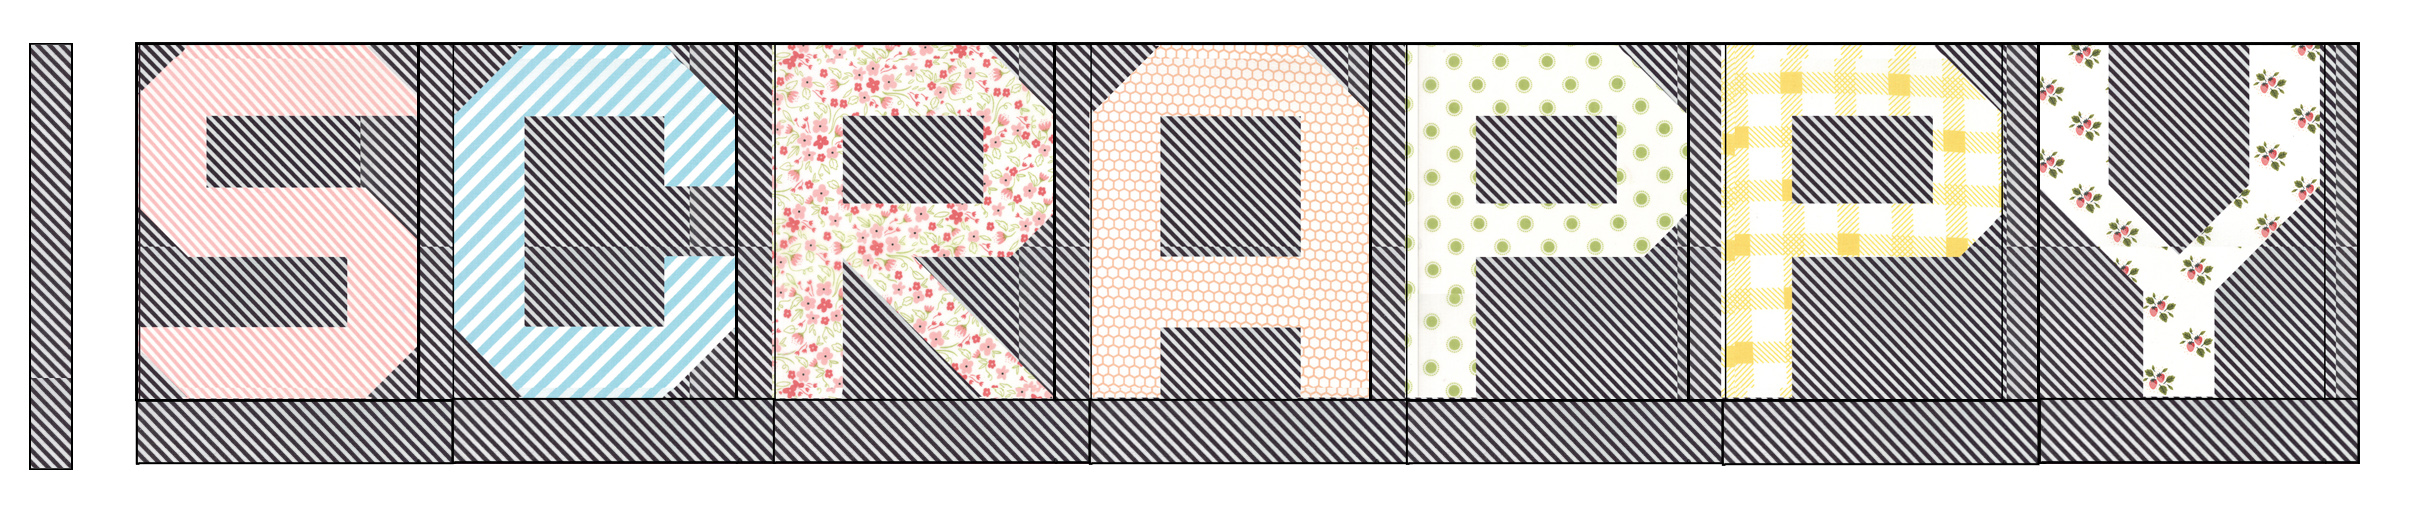
I have been dying to stitch up some of these sweet letter blocks since Moda released the free alphabet pattern back in early 2014. I've mixed Jelly Roll® strips from a couple of my newest Moda collections--Little Miss Sunshine (currently in shops), and Olive's Flower Market (shipping in November). I've also used low volume prints in lieu of a white background for the majority of letters... The exception is the word "SCRAPPY" because I decided to use a special background color to really make it stand out. But really, the whole point is that there are no rules to this quilt except SCRAPPY, SCRAPPY, SCRAPPY...
And can we talk about this quilting yumminess by Abby Latimer?! (I think I found my new favorite pantograph.)

This quilt finishes at 71" x 72 1/2". Let's get started!
![]()
NOTE: Because this is a scrap quilt, it's a little difficult to come up with the exact quantities used but I'll do my best:
- 27 Jelly Roll® strips for the letter blocks
- 5 Jelly Roll® strips/scraps for sawtooth stars
- Assortment of low-volume scraps for background
- 1 fat eighth arrow fabric
- 1 fat eighth arrow background fabric
- 1 yard of background fabric for the word "SCRAPPY" (total guess but I think this would be plenty)
- 1/2 yard border fabric
- 1 square 8'' x 8'' scrap for border corner squares
- 4 1/2 yards backing fabric
- 2/3 yard binding fabric
- 80'' x 80'' batting
![]()

1. The first step is to make all the letters. You will need 1 Jelly Roll® strip per letter (plus your desired background fabric). Instructions for each letter can found through the Spell it with Moda Pinterest page OR you can copy the web address below and just plug in the letter you are looking for... For example, here is the link address for the letter "a" pattern:
http://www.modafabrics.com/a_spellitwithfabric.pdf
(Do you see where I have bolded the letter "a" in the address? Just plug in whatever letter you need in that spot and it will pull up the PDF for that letter.)
Now here is something REALLY IMPORTANT! The last step of making each letter instructs to sew 1 rectangle 2 1/2'' x 9 1/2'' of background fabric to the bottom of each letter... DON'T sew it on just yet! Instead, make a pile of all of the 2 1/2'' x 9 1/2'' rectangles you cut from your low volume prints and set aside for later. (You will need 42 low-volume rectangles total in the pile--14 in addition to the ones cut for the letters). The idea is to mix them all up and create even more scrappiness later.
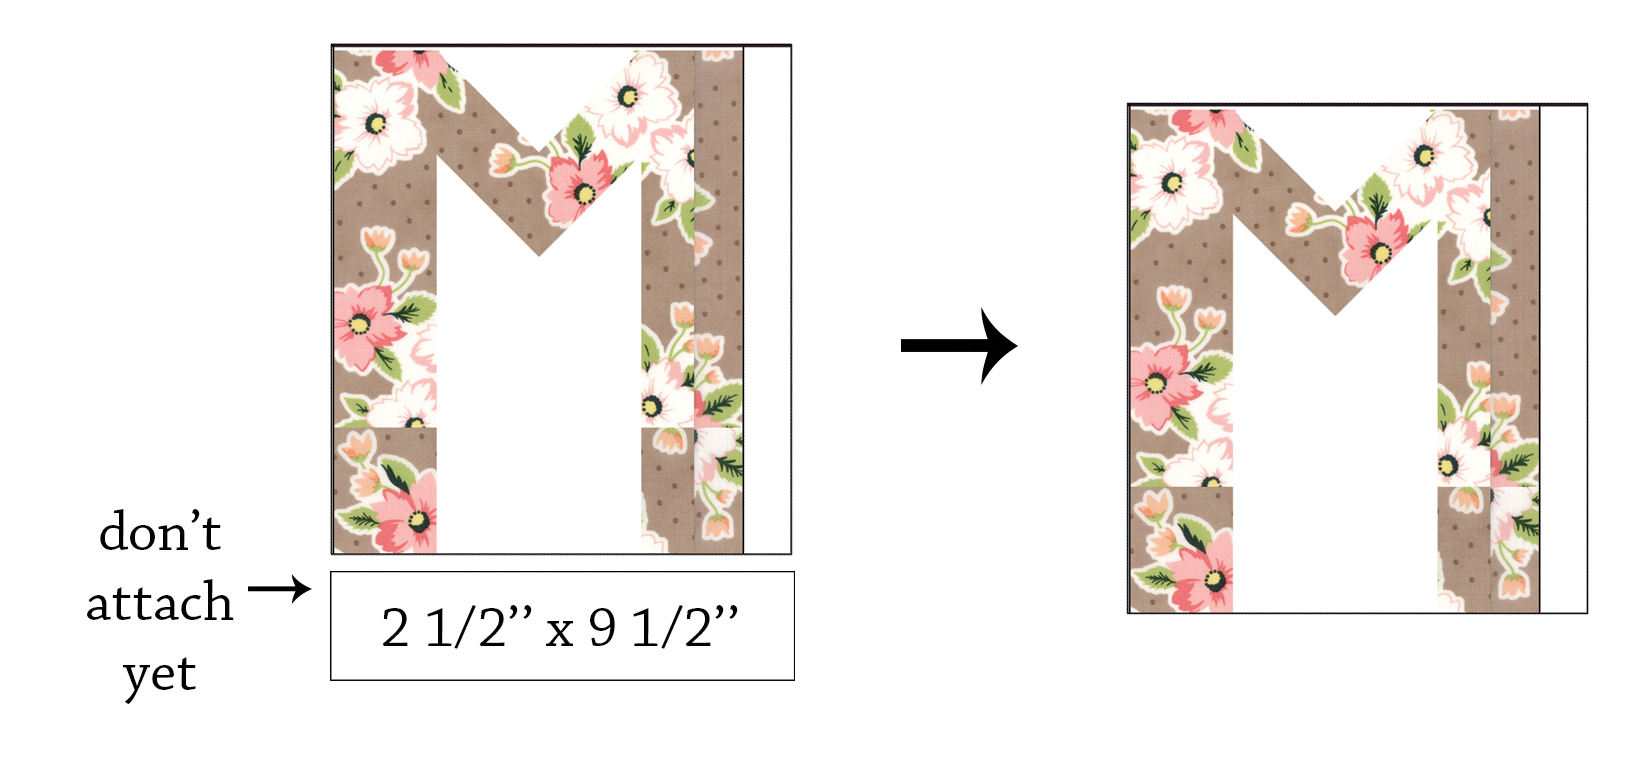
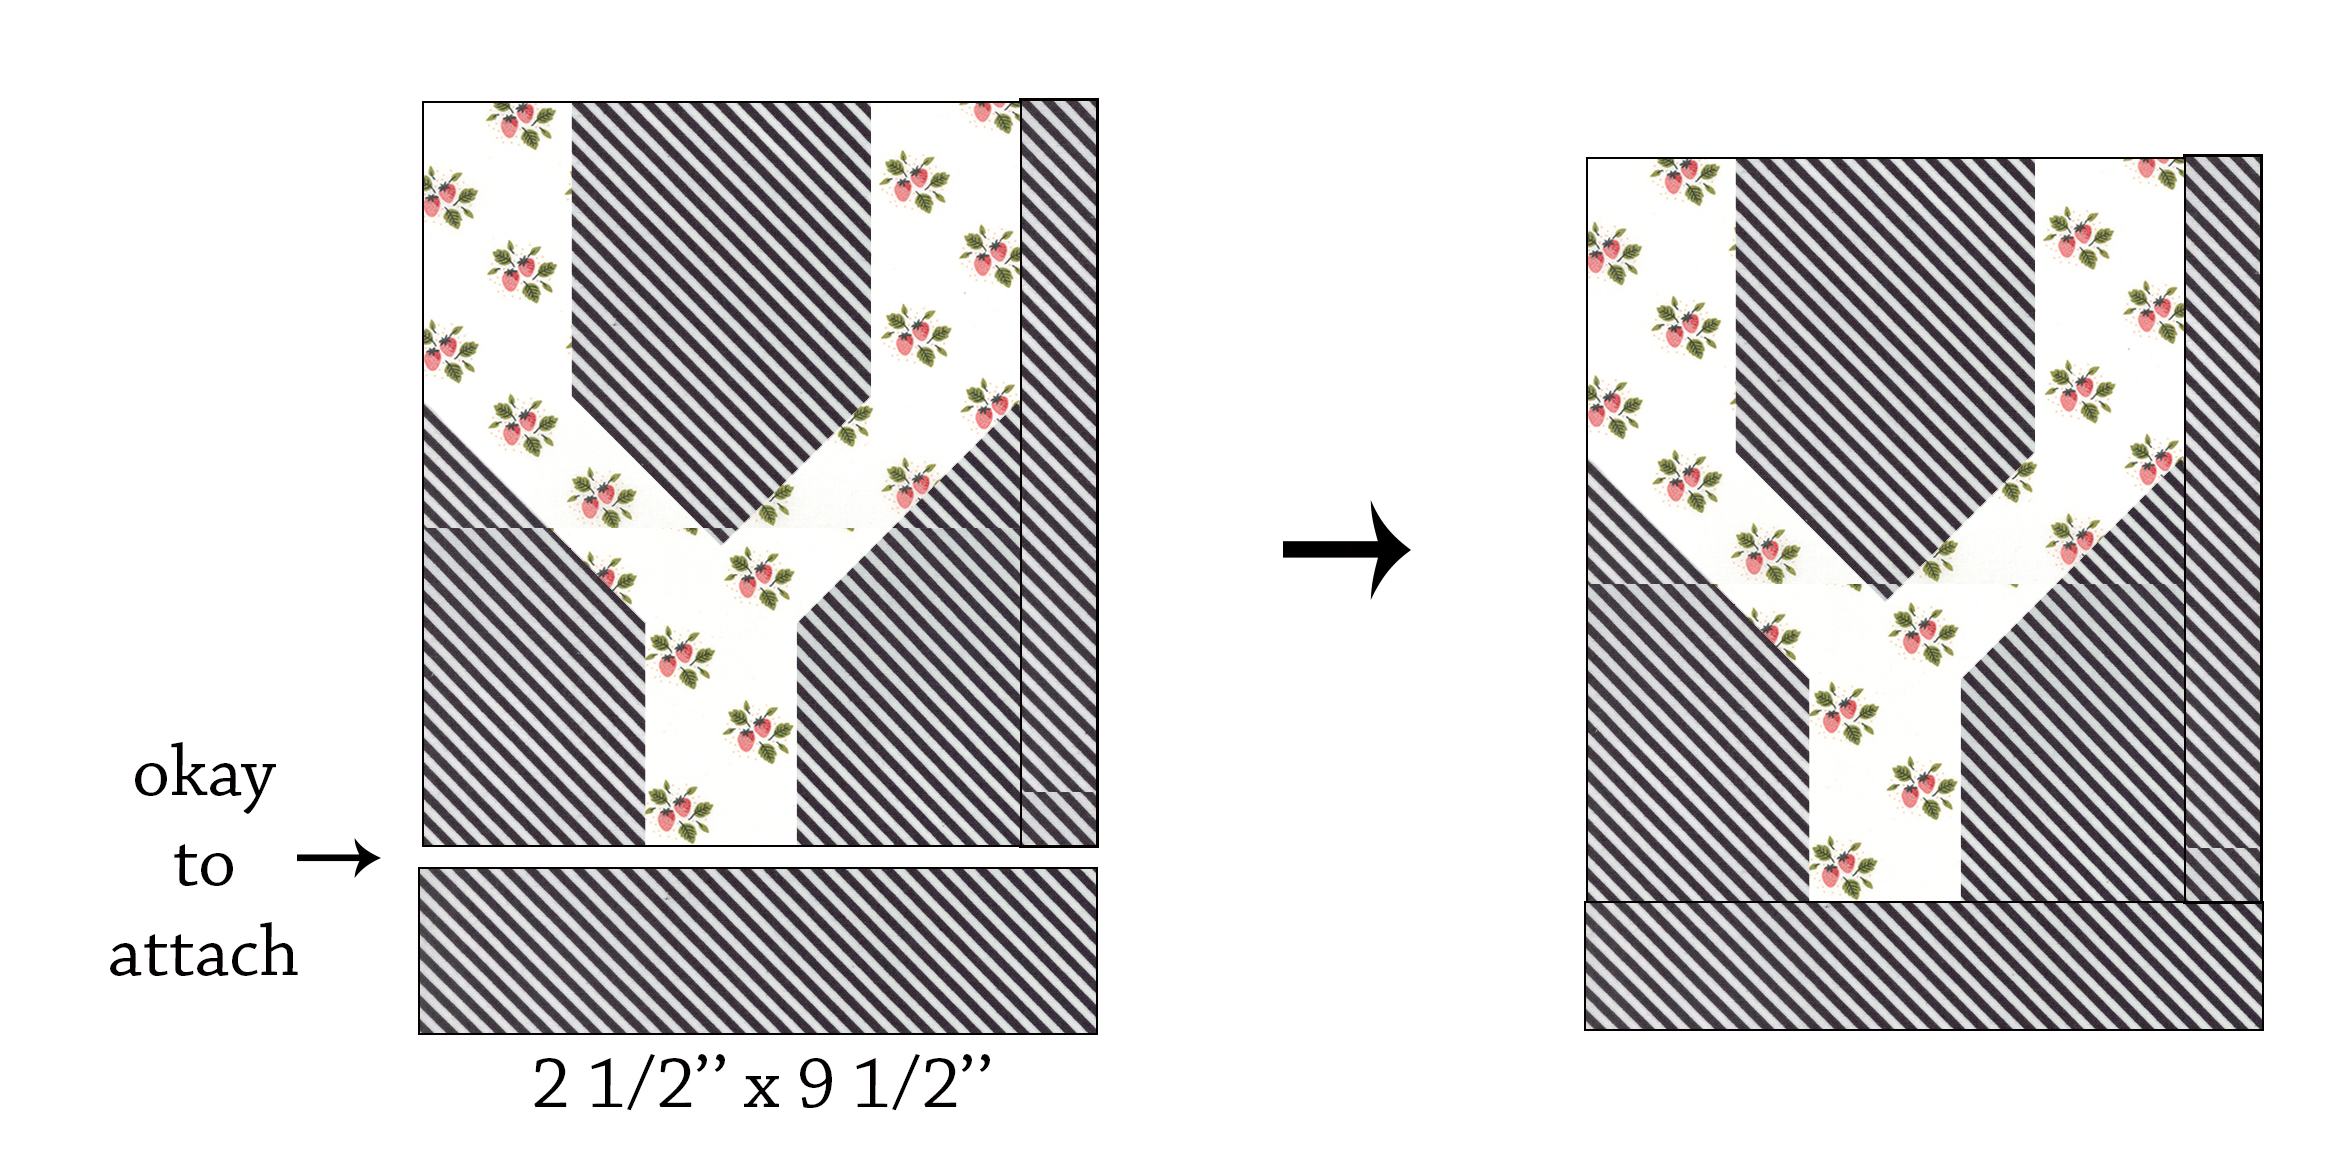
The exception is for the letters of the word "SCRAPPY" since those will all be framed in one background color. Go ahead and add those 2 1/2'' x 9 1/2'' rectangles to the bottom of each letter.
FILLER BLOCKS: Make 5 SAWTOOTH STAR FILLER blocks and *3 ARROW FILLER blocks:

*1 of the ARROW FILLER blocks will have 1 slight difference from the other 2 per the instructions.
2. To make 1 SAWTOOTH STAR FILLER block, take 1 Jelly Roll® strip/scrap and cut the following:
- 1 square 2 1/2'' x 2 1/2''
- 8 squares 1 1/2'' x 1 1/2''
From the background fabric, cut the following:
- 4 squares 1 1/2'' x 1 1/2''
- 4 rectangles 1 1/2'' x 2 1/2''
- 2 rectangles 2 1/2'' x 4 1/2''
- 2 rectangles 3 1/2'' x 8 1/2''
- 1 rectangle 1 1/2'' x 10 1/2''
FLYING GEESE:Make 4 flying geese units using 8 squares 1 1/2'' x 1 1/2'' of the Jelly Roll® print and 4 rectangles 1 1/2'' x 2 1/2'' of background fabric.

Arrange 4 flying geese units with 1 square 2 1/2'' x 2 1/2'' of Jelly Roll® print and 4 squares 1 1/2'' x 1 1/2'' of background fabric. Sew the units into rows; press. Sew the rows together, press.

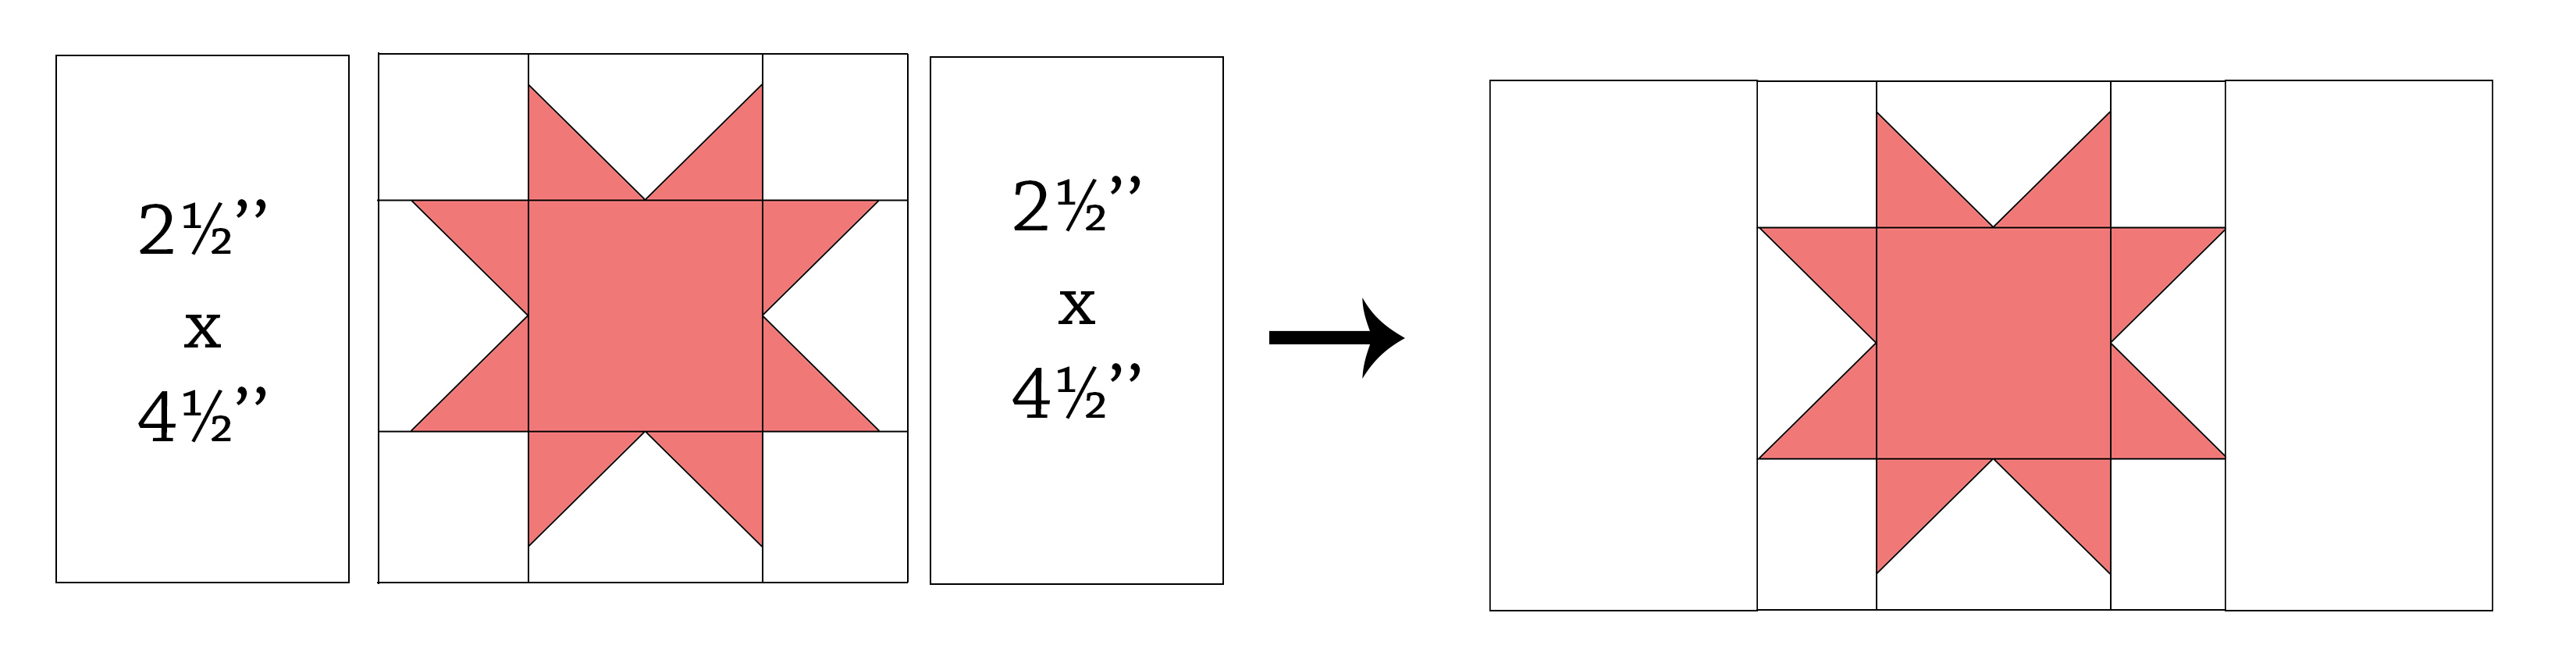
Sew 2 rectangles 2 1/2'' x 4 1/2'' to the sides of the sawtooth star unit Press.
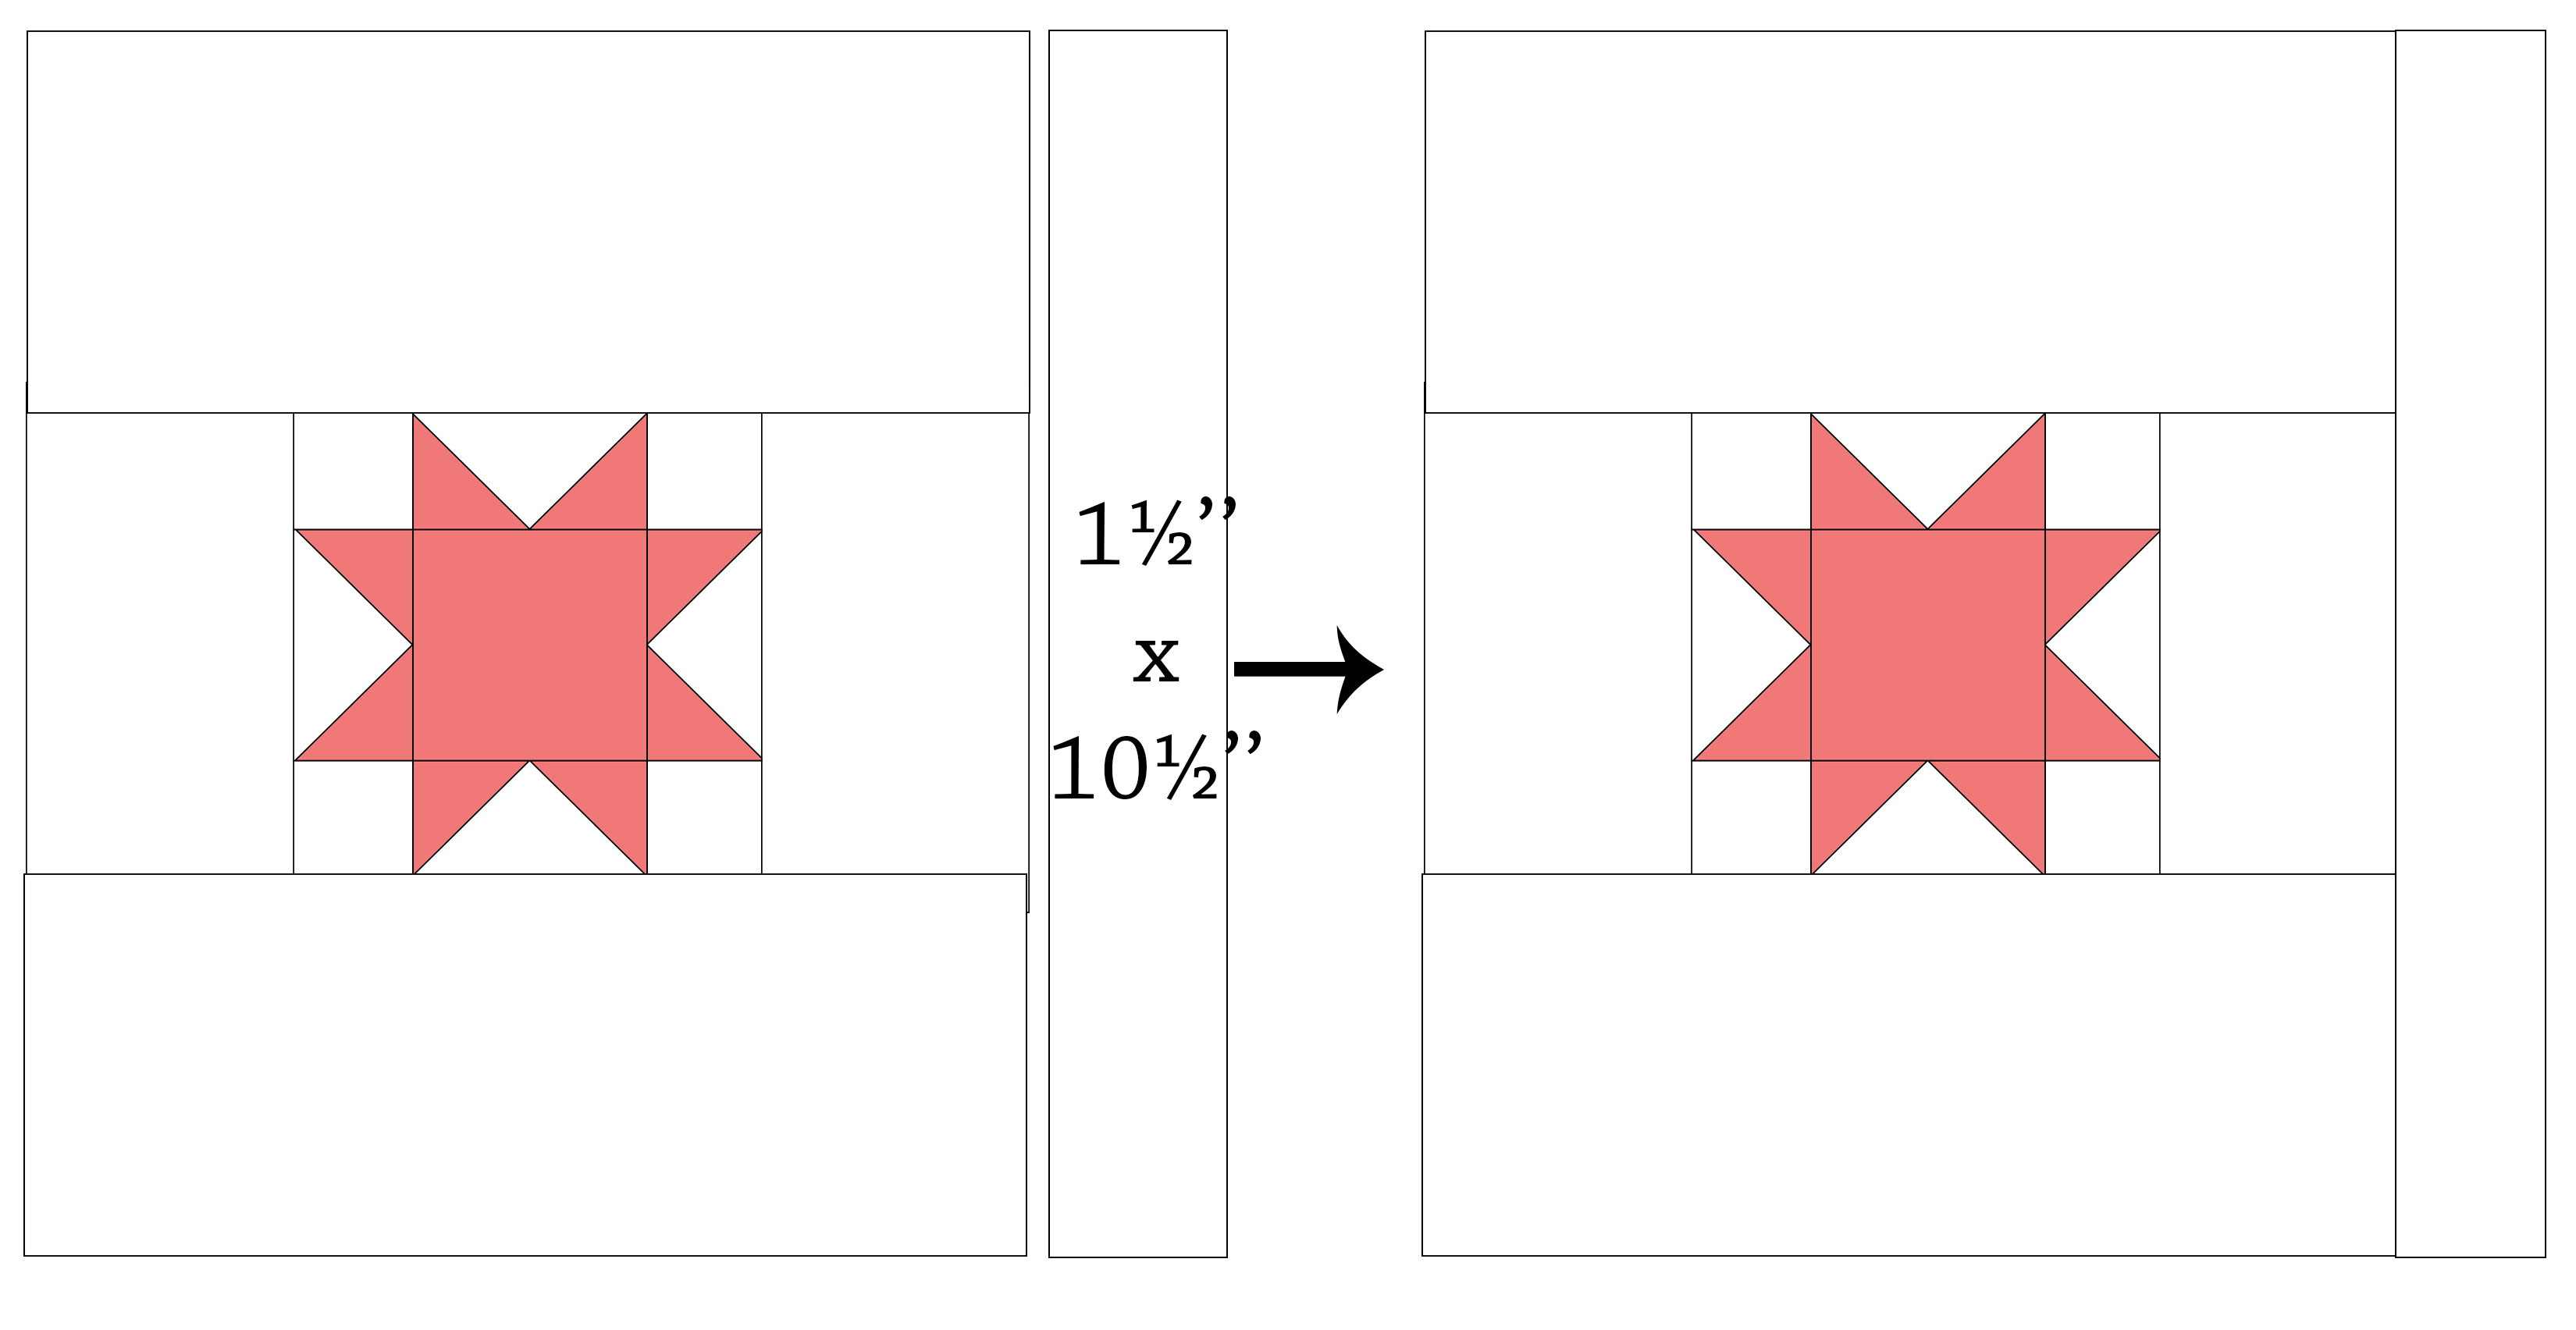
Sew 2 rectangles 3 1/2'' x 8 1/2'' to the top and bottom of the sawtooth star unit. Press.

Attach 1 rectangle 1 1/2'' x 10 1/2'' to the right side of the block. Press. Make 5.
3. To make 1 ARROW FILLER block, take 1 Jelly Roll® strip and cut the following:
- 2 rectangles 2 1/2'' x 10 1/2''
From the background fabric, cut the following:
- 2 squares 6'' x 6''
- *1 rectangle 1 1/2'' x 10 1/2''
Cut each 6'' x 6'' background square in half at the diagonal.

Place 1 rectangle 2 1/2'' x 10 1/2'' of arrow fabric onto your cutting mat. To the bottom-left edge, measure over 2 1/2'' and make a small mark. Draw a straight line from the top-left corner down to the small mark. Cut along the marked line. Make another 45 degree cut parallel to the first by measuring 2 1/2'' away from the top-right edge and making a small mark. Draw a straight line from the bottom-right corner to that small mark. Cut along the marked line to get 1 parallelogram.
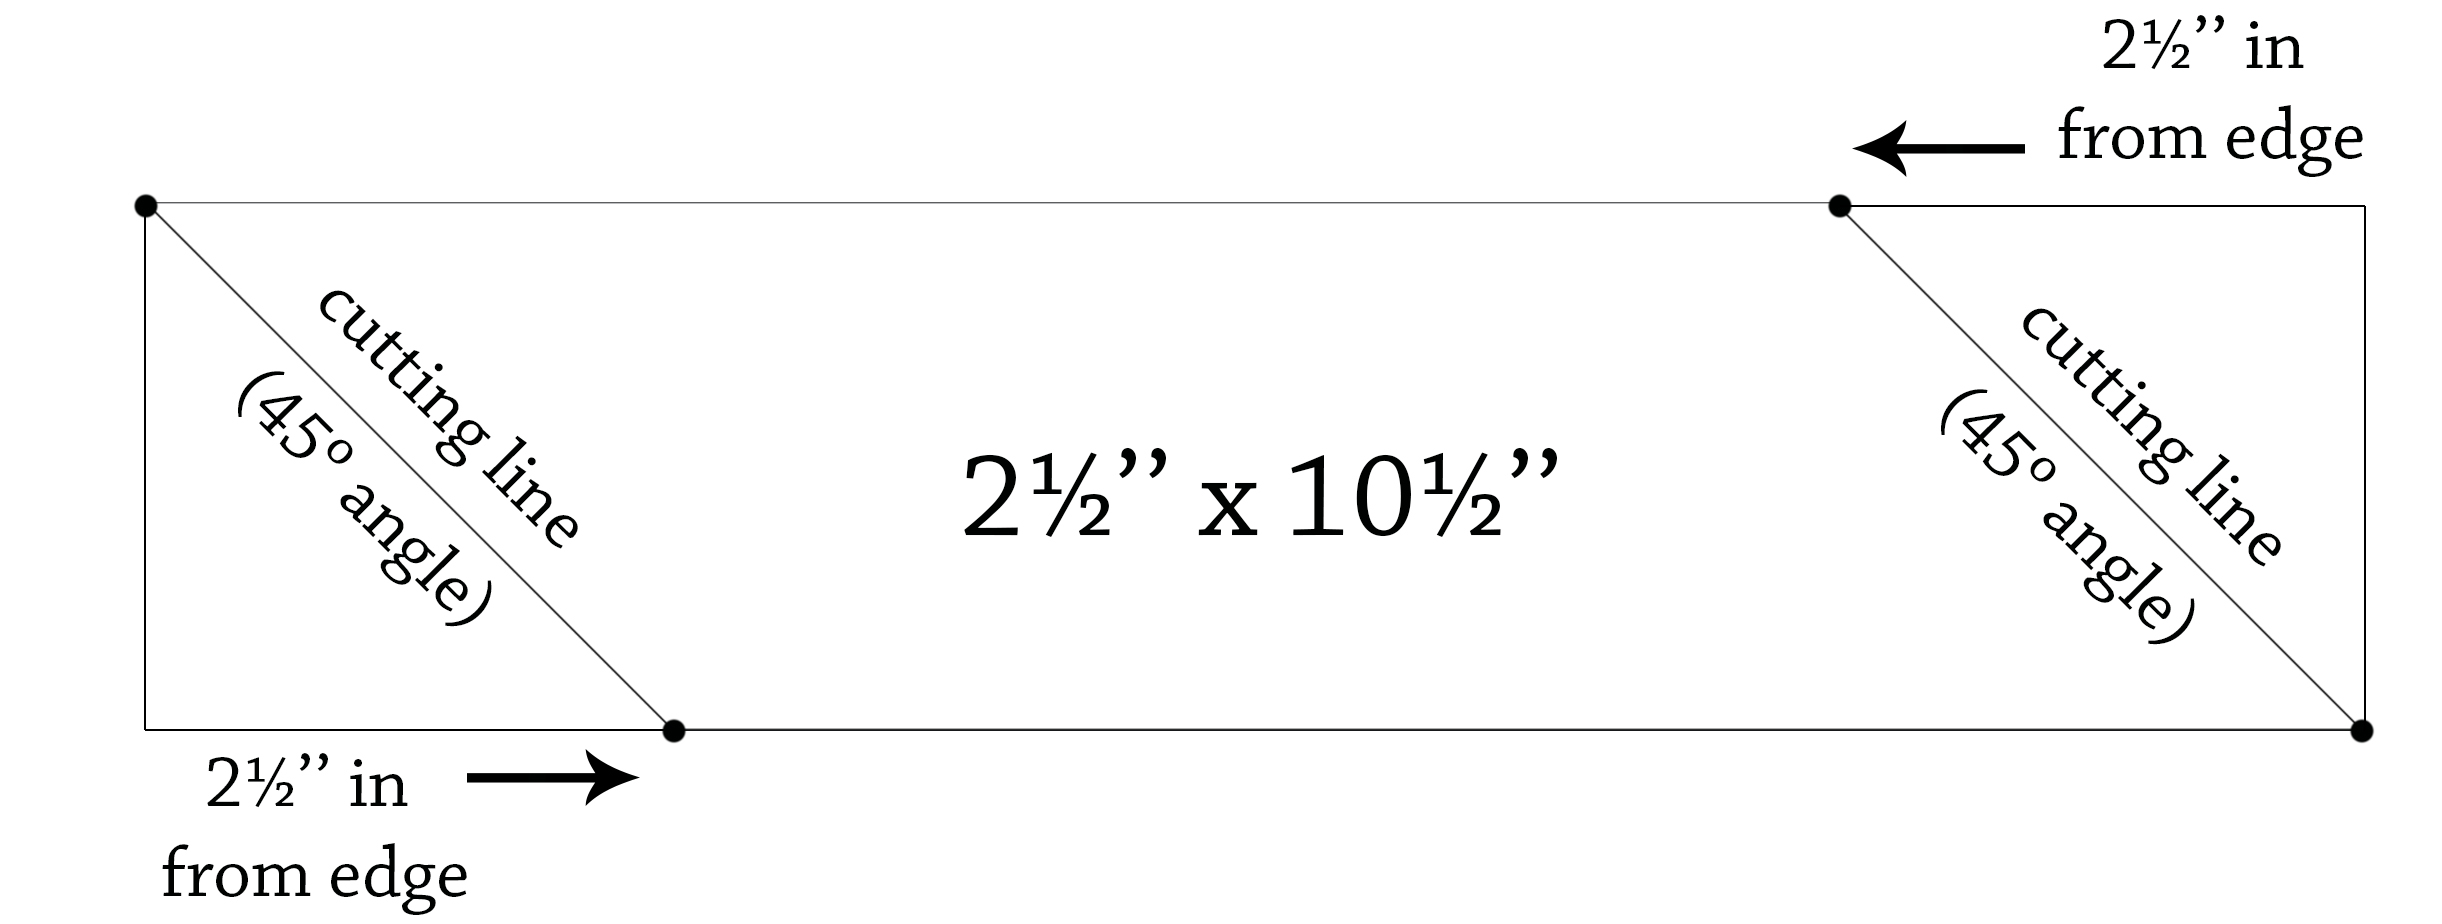
Place 1 rectangle 2 1/2'' x 10 1/2'' of arrow fabric onto your cutting mat. To the top-left edge, measure over 2 1/2'' and make a small mark. Draw a straight line from the bottom-left corner up to the small mark. Cut along the marked line. Make another 45 degree cut parallel to the first by measuring 2 1/2'' away from the bottom-right edge and making a small mark. Draw a straight line from the top-right corner down to the small mark. Cut along the marked line to get 1 parallelogram (mirror image to the first parallelogram).

Arrange all units into rows as indicated. **Sew the units into rows; press.
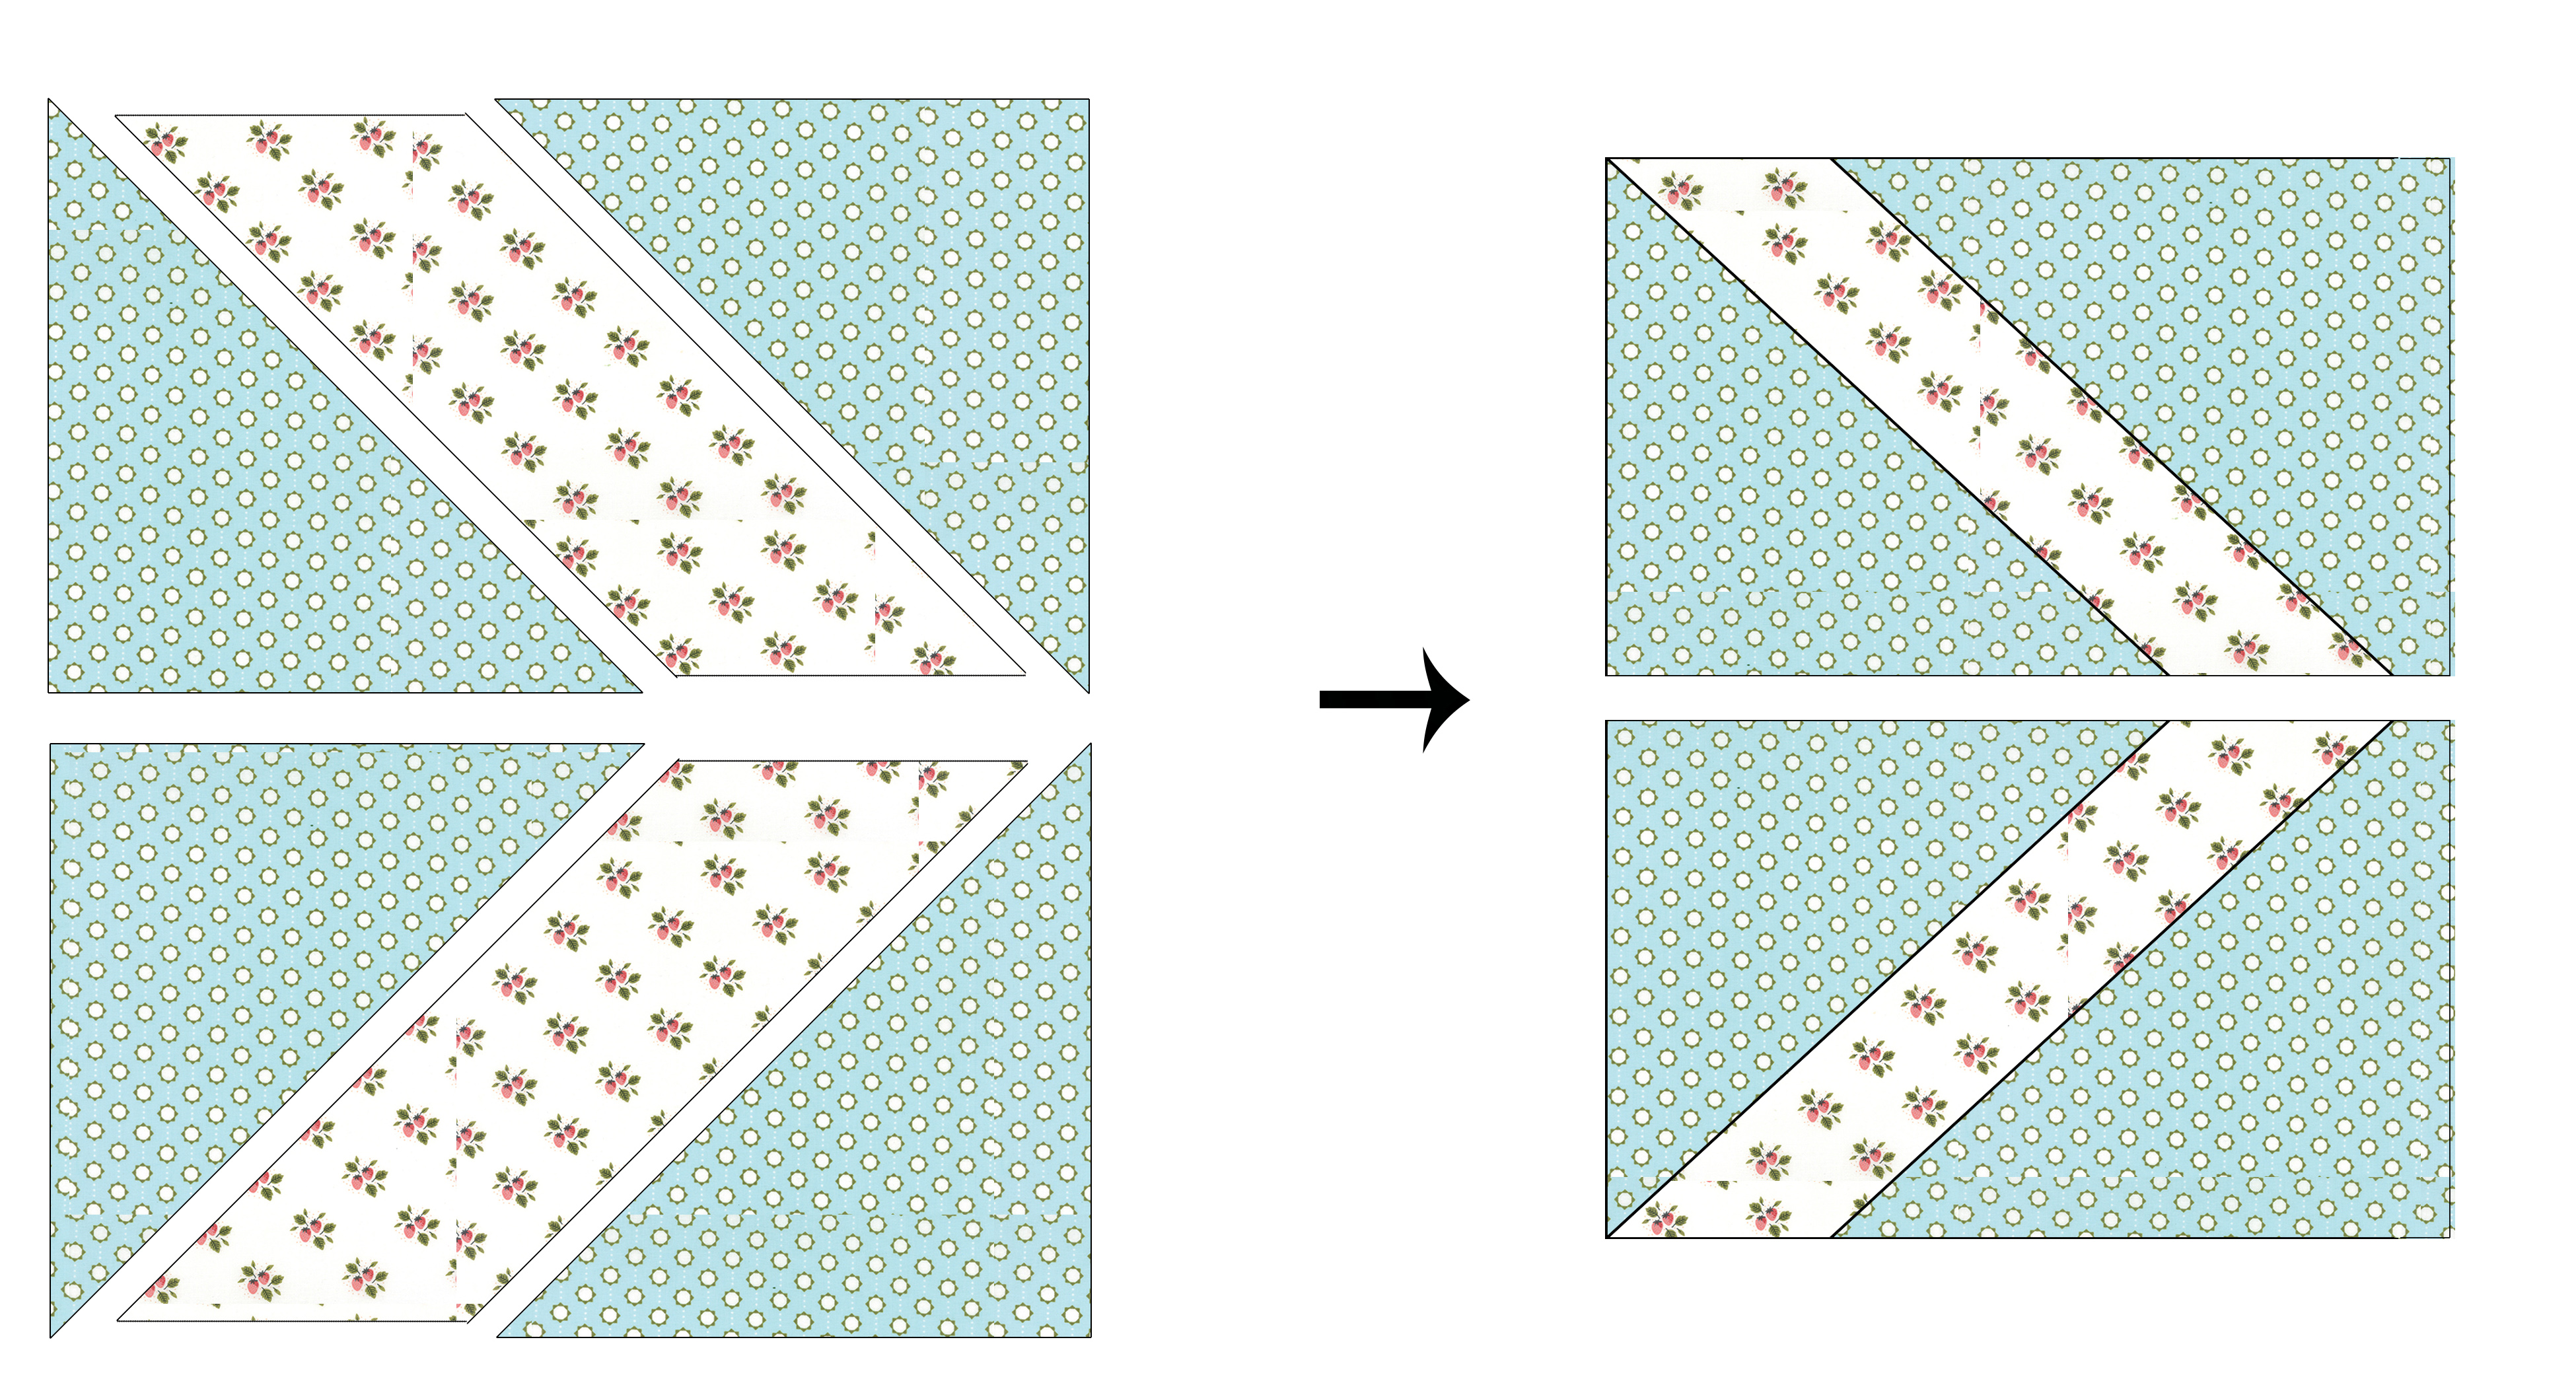
**NOTE: When bringing the units right sides together to sew into their rows, you will notice overlap of some of the points. This is normal. See the diagrams below to see examples of the units should look for each step.

Sew the rows together; press.
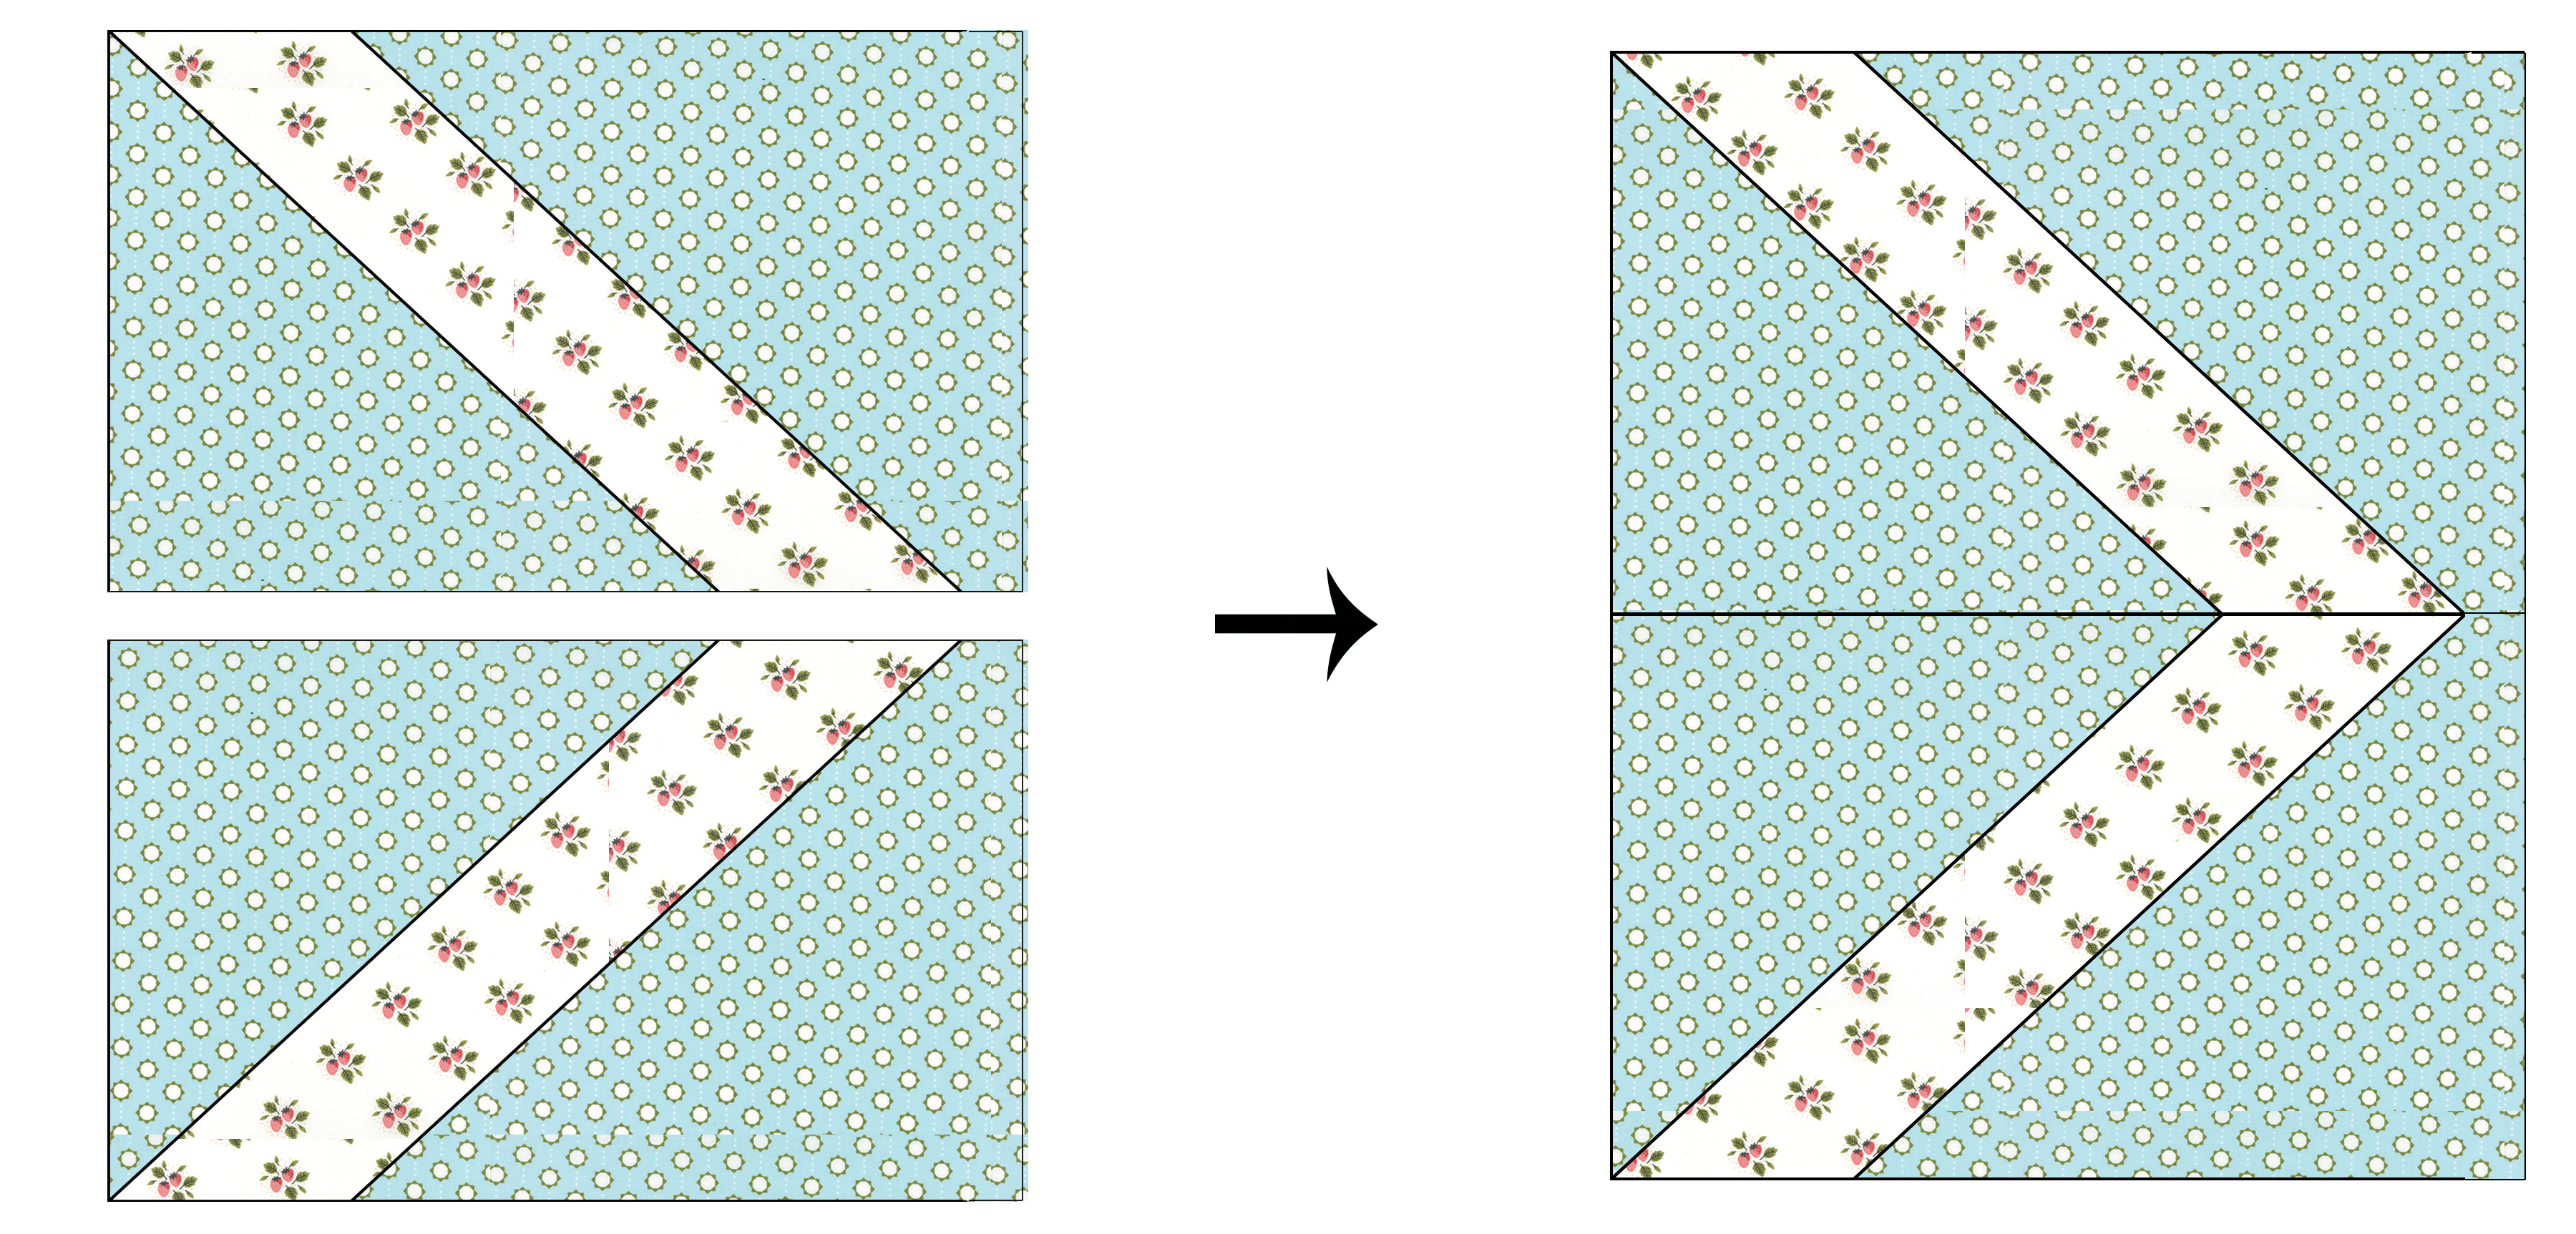
Attach 1 rectangle 1 1/2'' x 10 1/2'' to the right side of the unit. Press. Make 2.

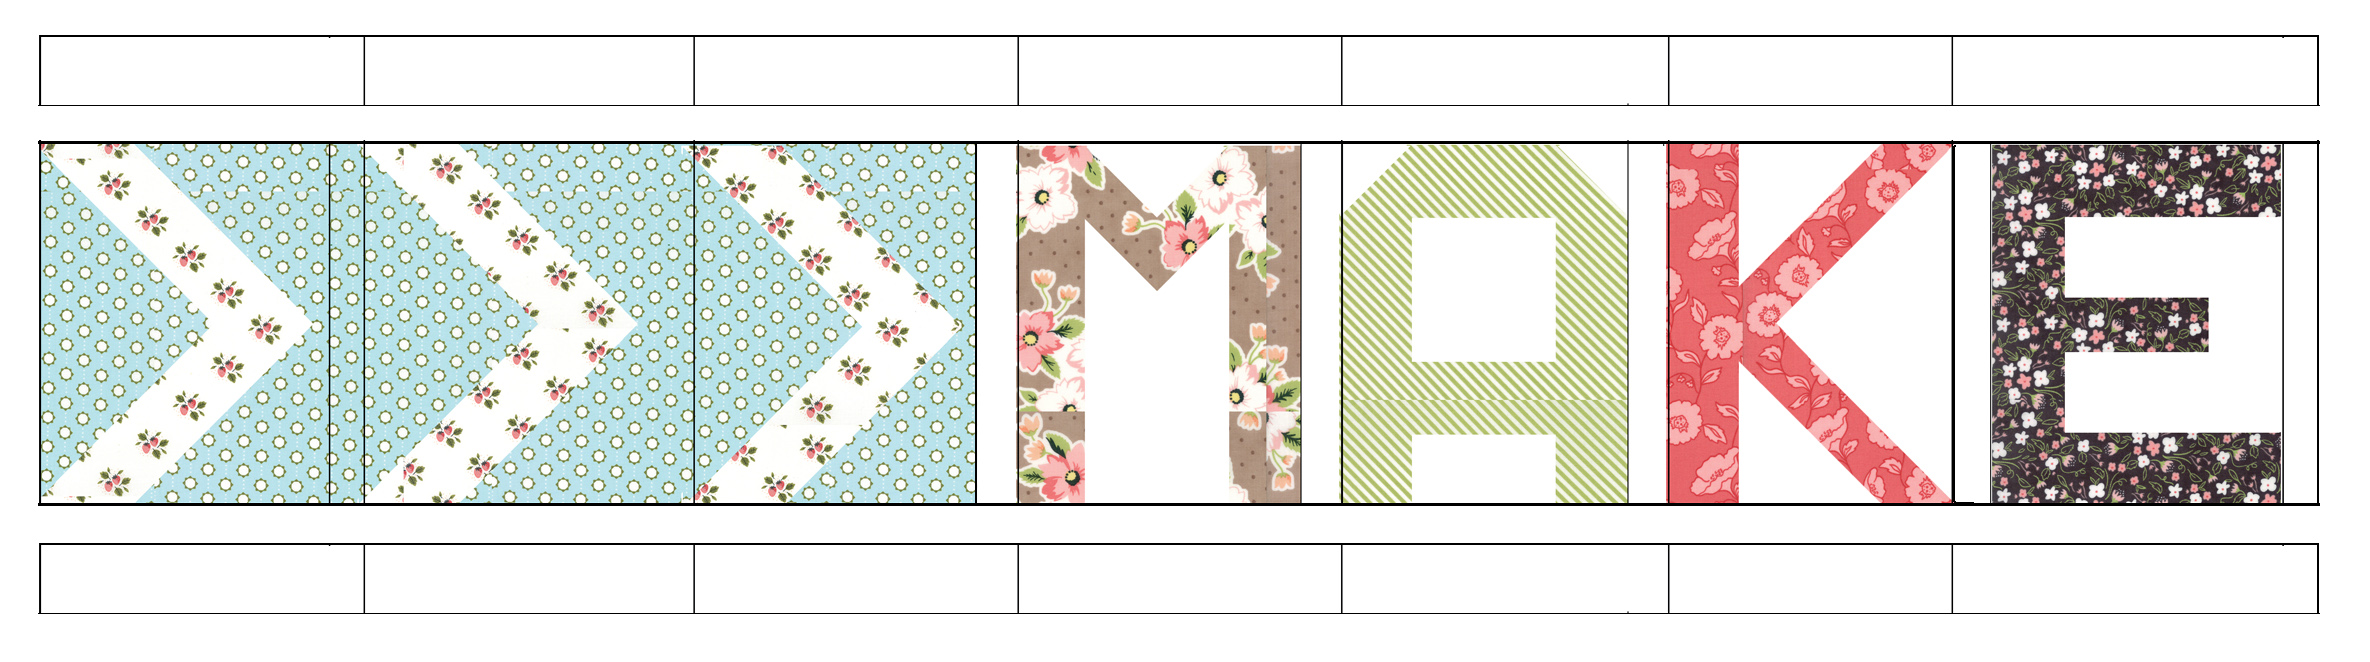
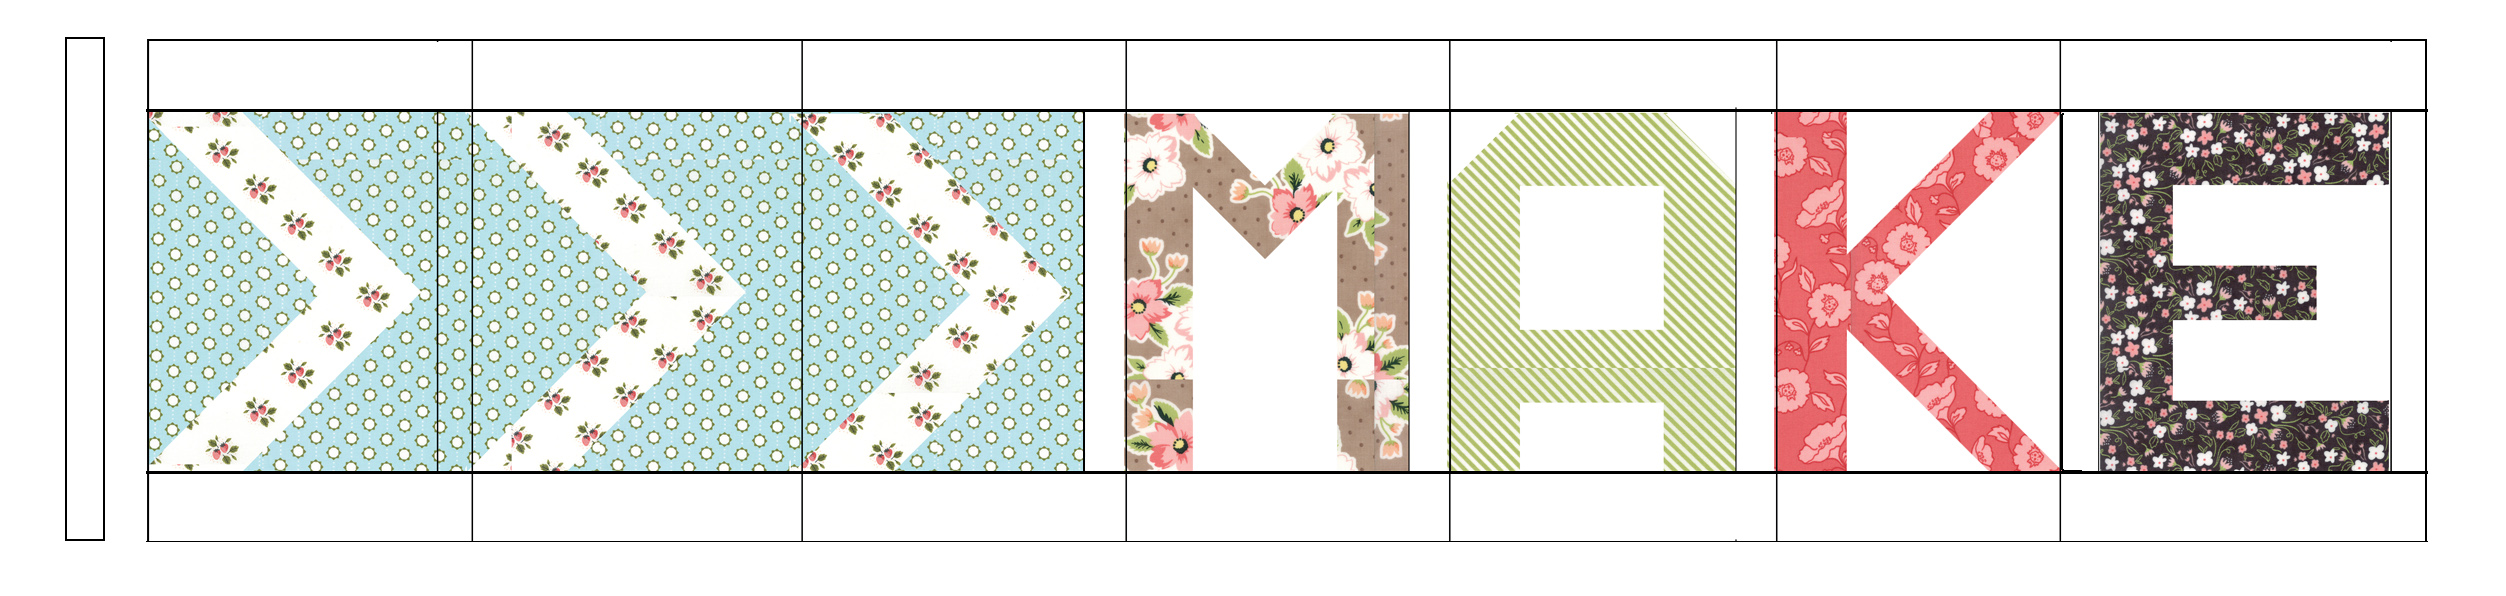
*Make 1 more ARROW FILLER block, but cut and attach a low volume rectangle 1 1/2'' x 10 1/2'' instead of in the arrow background fabric. This ARROW FILLER block will be sewn to the left of the "M" in "MAKE" and there needs to be a low volume separator instead of the arrow background fabric color (see below).

Congrats! All your blocks are made!
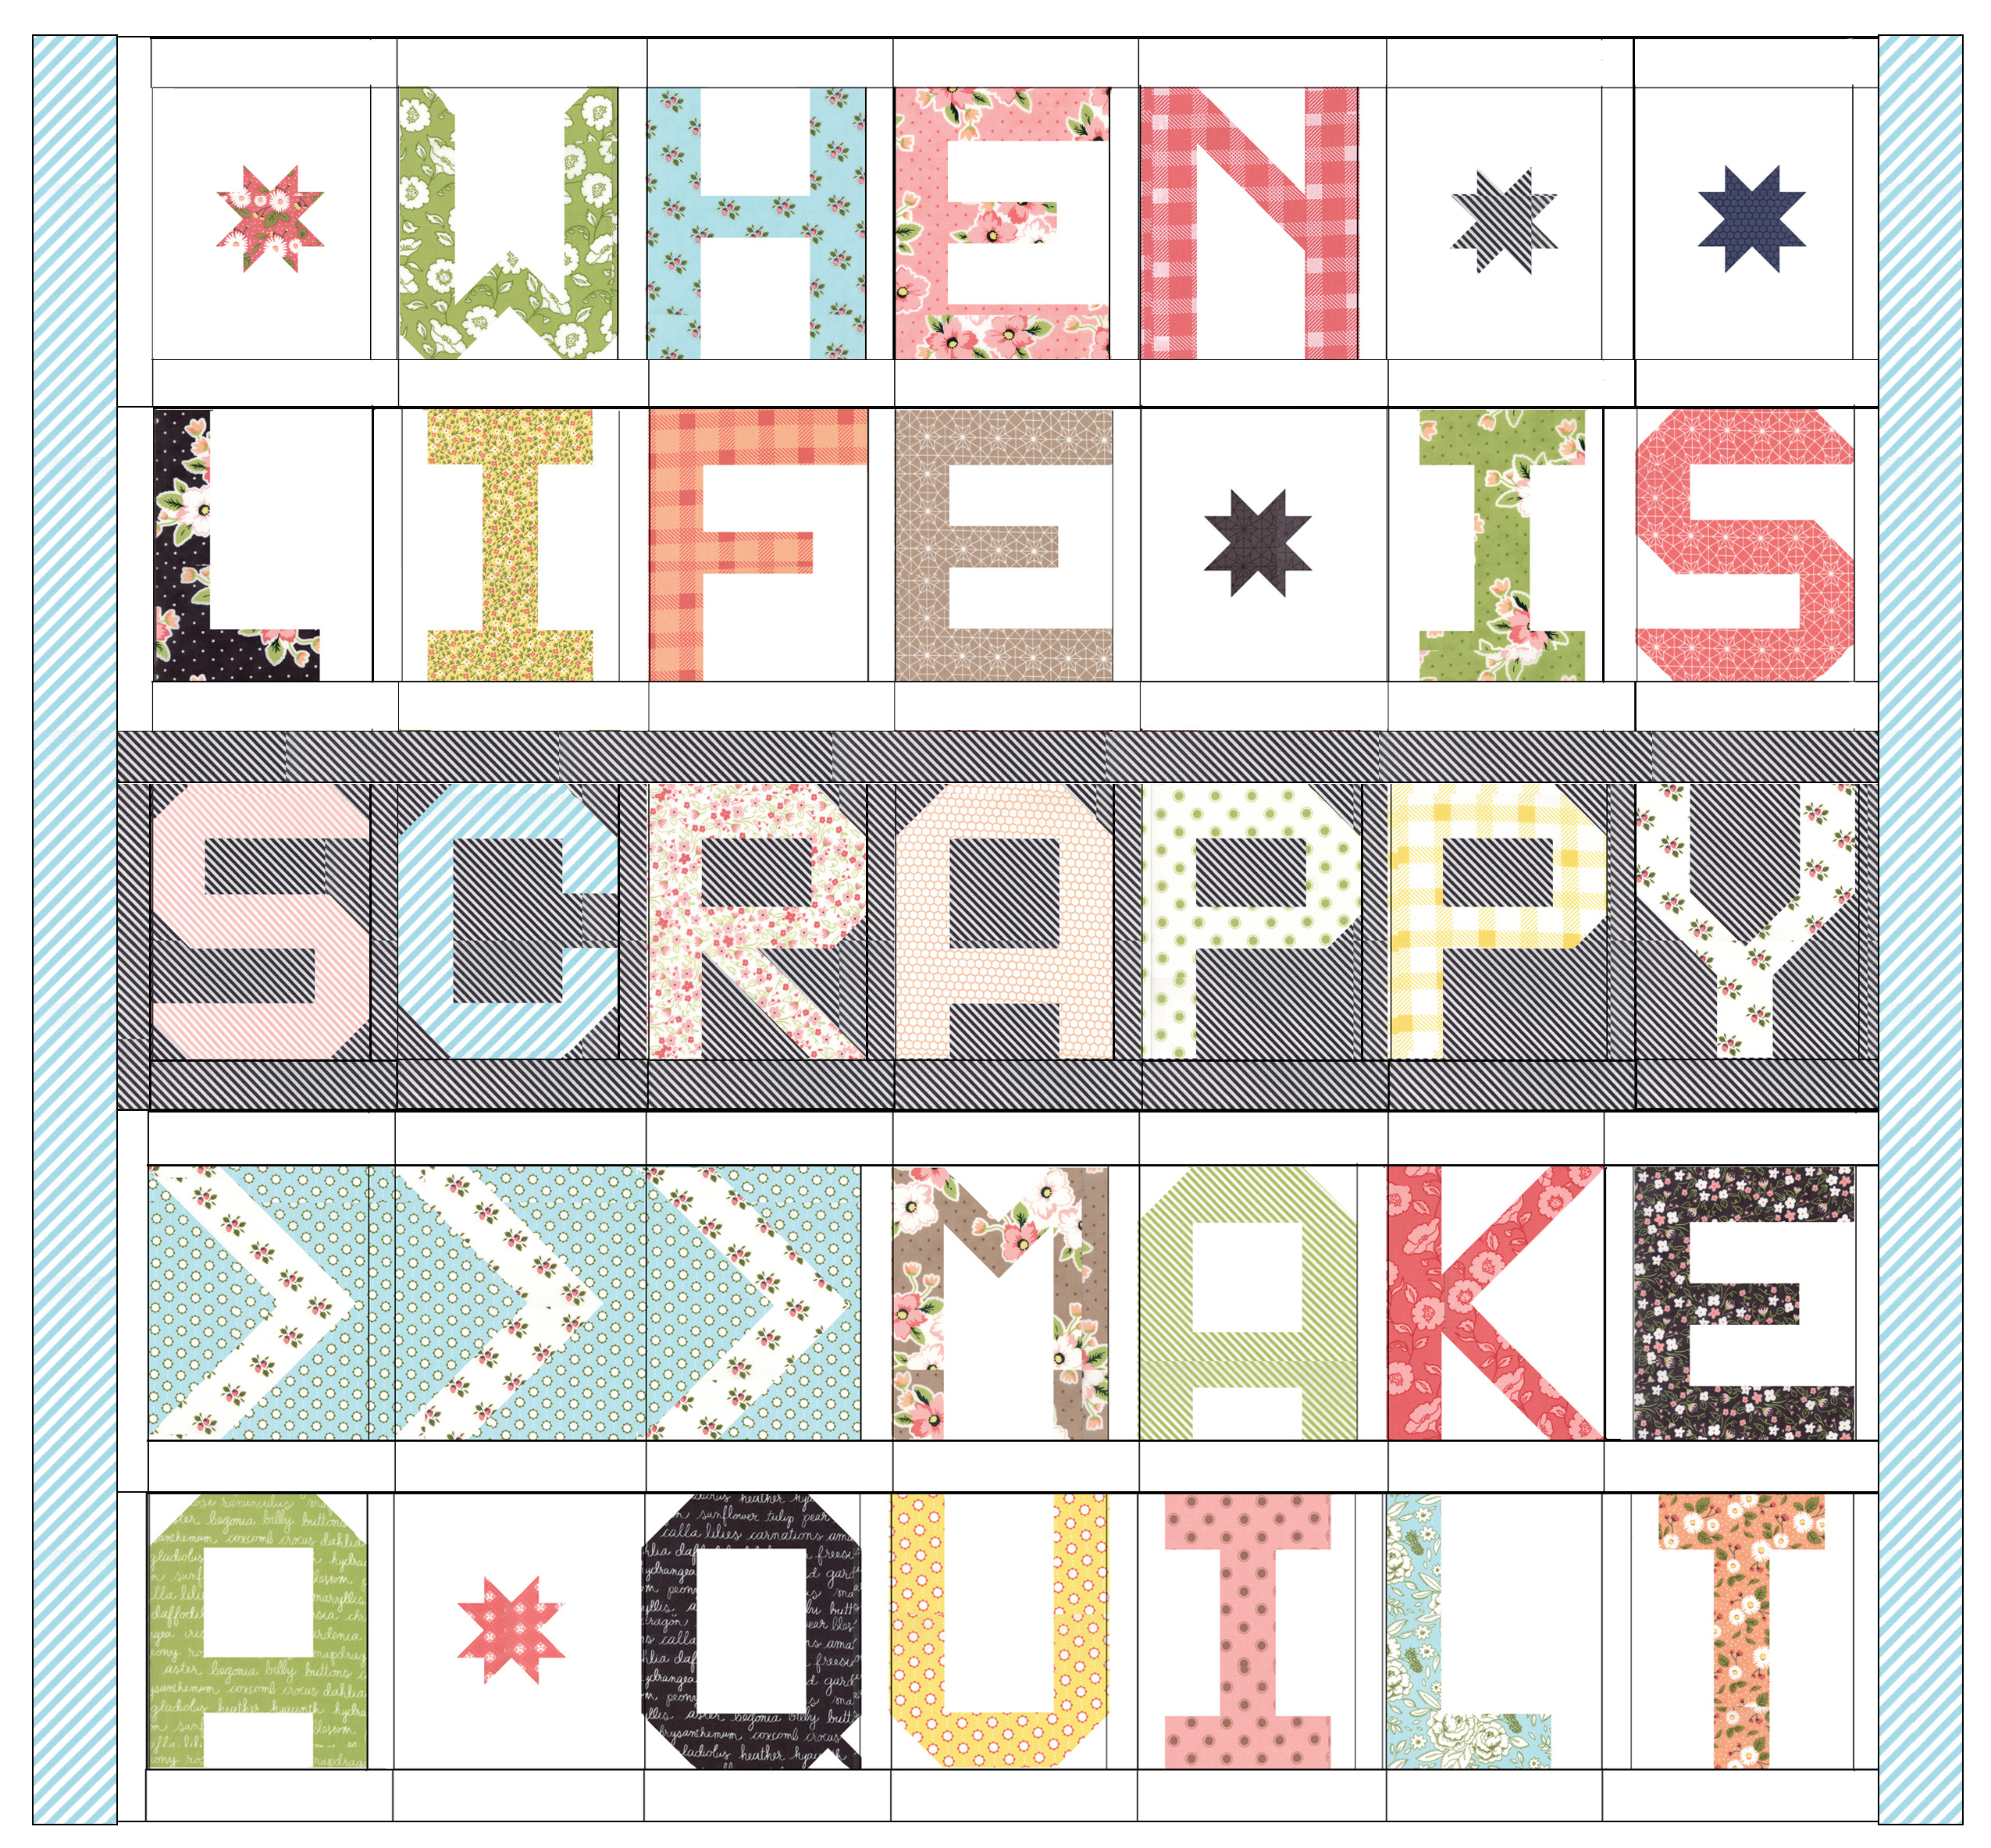
QUILT-TOP ARRANGEMENT:
4. Since each row comes together a little differently, the easiest way to explain the quilt-top assembly is to take it line by line:
Line #1: Gather the "WHEN" letters, 3 SAWTOOTH STAR FILLER blocks, and 14 of those low volume rectangles 2 1/2'' x 9 1/2''. Arrange and sew the units into 3 rows as shown; press. Sew the rows together; press.

Cut and attach 1 low volume strip 1 1/2'' x 14 1/2'' to the left side of this row; press.

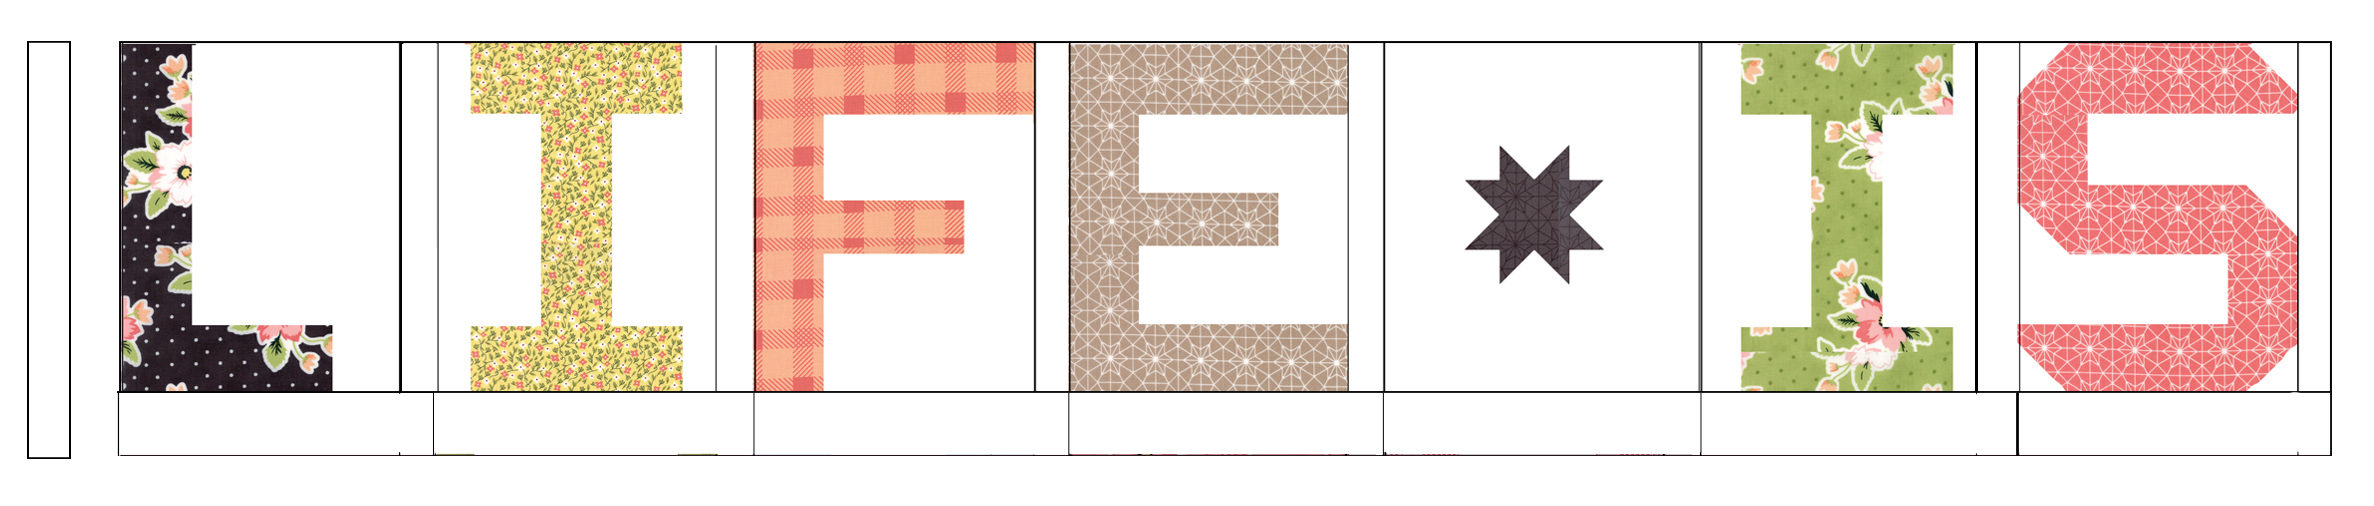
Line #2: Gather the "LIFE" "IS" letters, 1 SAWTOOTH STAR FILLER block, and 7 low volume rectangles 2 1/2'' x 9 1/2''. Arrange and sew the units into 2 rows as shown; press. Sew the rows together; press.

Cut and attach 1 low volume strip 1 1/2'' x 12 1/2'' to the left side of this row; press.
Line #3: Gather the "SCRAPPY" letters, 2 strips 2 1/2'' x WOF of (special) background fabric, and 1 rectangle 1 1/2'' x 12 1/2'' of (special) background fabric. First, sew the letters into 1 row with the 1 rectangle 1 1/2'' x 12 1/2'' to the left-side; press.
Sew 2 strips 2 1/2'' x WOF together end-to-end. Measure the length of the "SCRAPPY" row and trim the strip to that measurement (should be approximately 64 1/2'' long). Attach to the top of the row; press.

Line #4: Gather the "MAKE" letters, 3 ARROW FILLER blocks, and 14 low volume rectangles 2 1/2'' x 9 1/2''. Arrange and sew the units into 3 rows as shown; press. Sew the rows together; press.
Cut and attach 1 low volume strip 1 1/2'' x 14 1/2'' to the left side of this row; press.
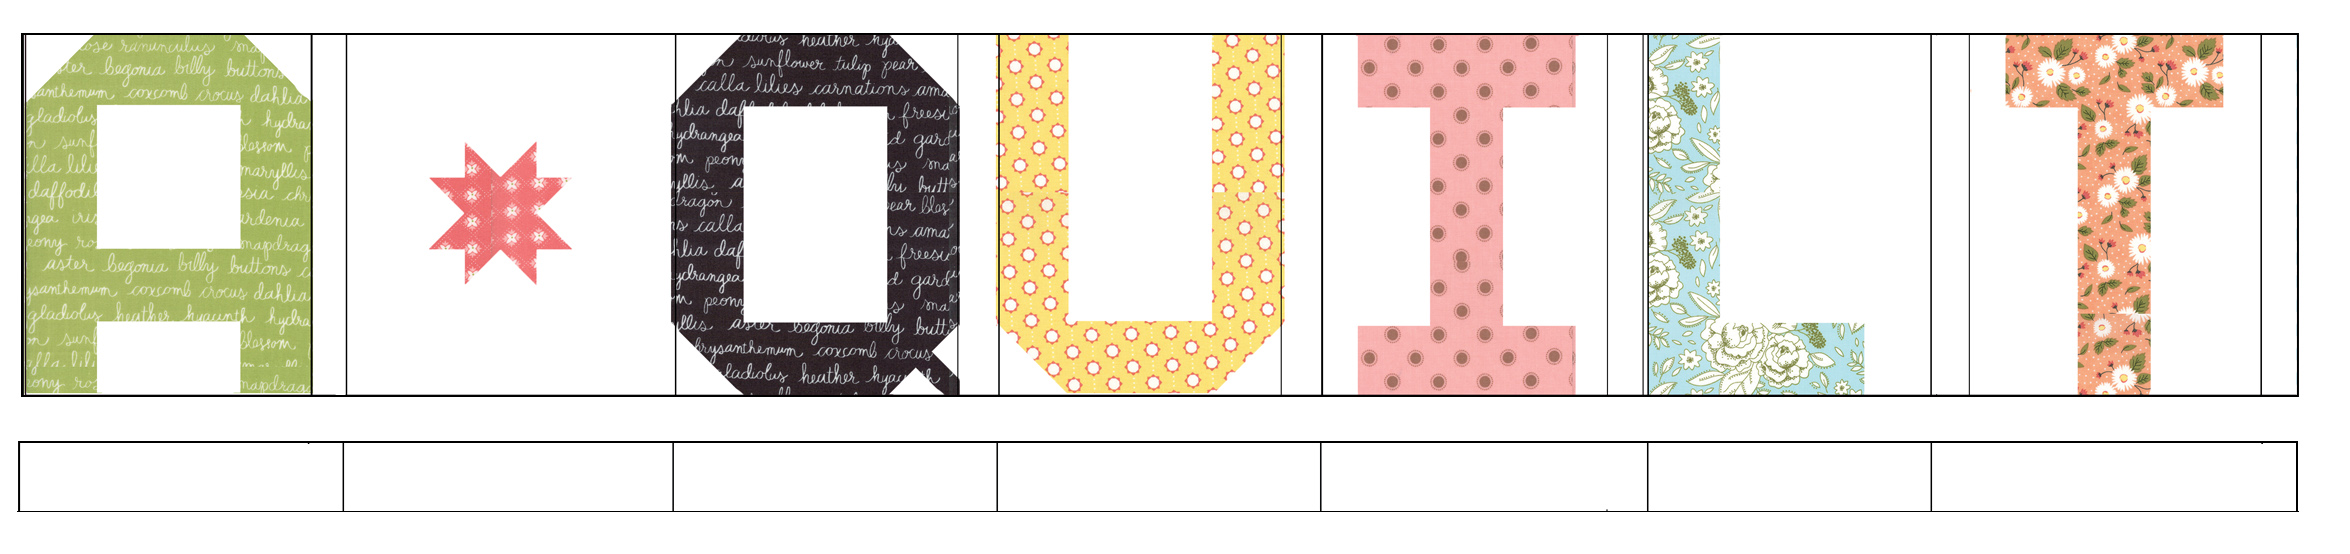
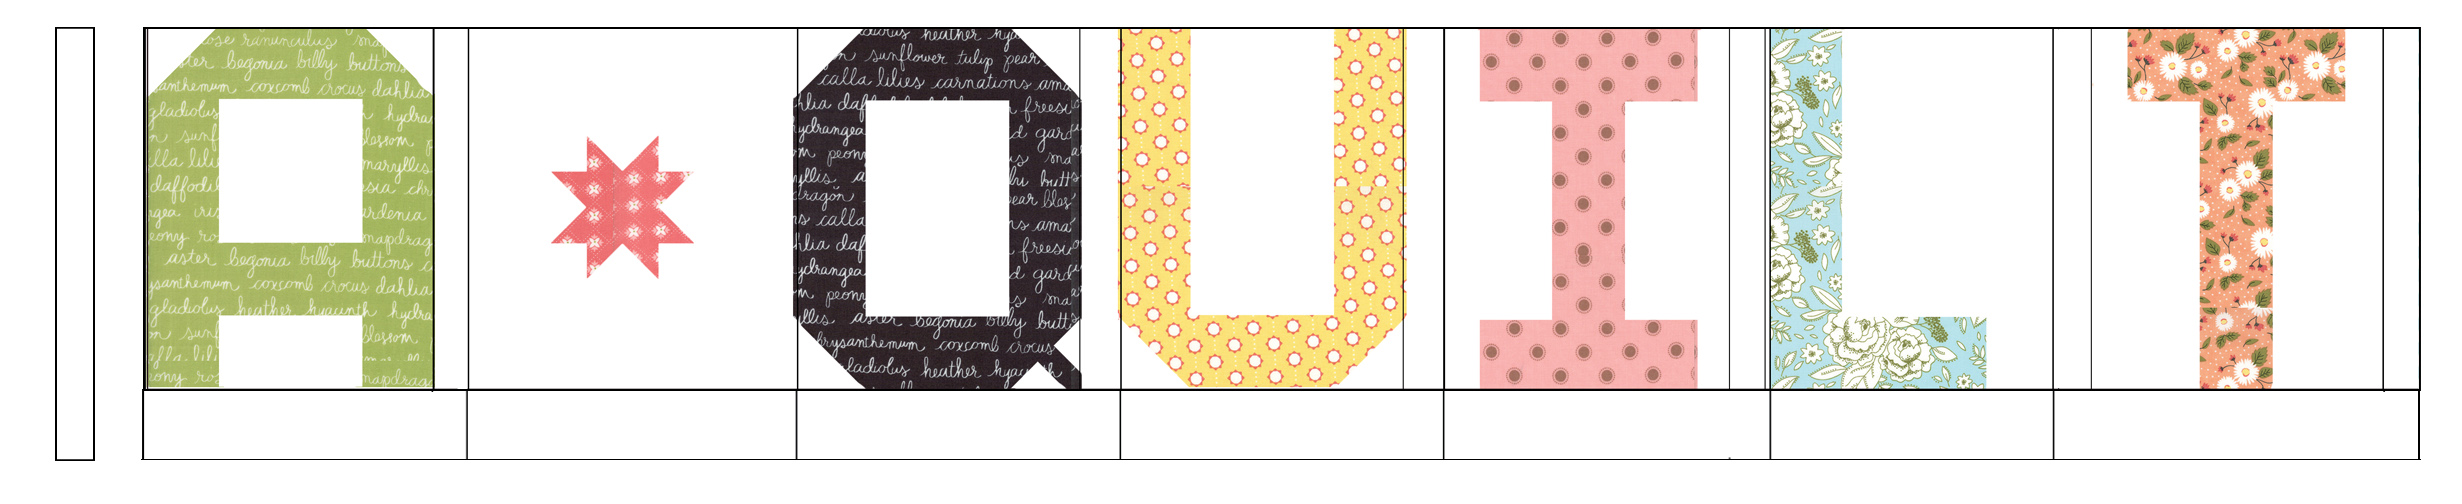
Line #5: Gather the "A" "QUILT" letters, 1 SAWTOOTH STAR FILLER block, and 7 low volume rectangles 2 1/2'' x 9 1/2''. Arrange and sew the units into 2 rows as shown; press. Sew the rows together; press.
Cut and attach 1 low volume strip 1 1/2'' x 12 1/2'' to the left side of this row; press.
SEW THE ROWS TOGETHER :)

BORDER:
From the border fabric, cut 8 strips 3 1/2'' x WOF. Piece 2 strips together end-to-end to get 1 new strip that measures approximately 3 1/2'' x 80''. Make 4. From the border corner square fabric, cut 4 squares 3 1/2'' x 3 1/2''.
Now we need to trim the pieced border strips to fit the sides of the quilt-top. To determine the length of the strips for the sides, measure the height of the quilt-top in 3 places and take the average. Trim 2 pieced border strips to that length (I estimate it should be around 3 1/2'' x 68 1/2'' but it is best to measure) and sew to the sides, pinning in place beforehand.
To determine the length of the top/bottom border strips, measure the width of the quilt-top in 3 places and take the average. Trim 1 pieced border strips to that width (I calculate it should be 3 1/2'' x 64 1/2''.) Sew 1 border corner square 3 1/2'' x 3 1/2'' to each end; press. Make 2.
![]()
Sew the pieced border strips to the top and bottom of the quilt. Press.

Baste, quilt and bind using desired method.
![]()
I hope you enjoyed this tutorial! Check out my other patterns at lellaboutique.com
Vanessa Goertzen
{lellaboutique.blogspot.com}
![]()
Posted in: