Welcome to Moda Fabrics!
Butterfly Trellis Quilt
Butterfly Trellis Quilt
Published:
Nov 13 2015 - 23:00


Hi all! It's Cathy again from A Quilting Chick, here to share with you my latest project for Moda Bake Shop, Butterfly Trellis. Don't you just love butterflies?!? So bright and delicate. They show the promise of new life in the Spring which is exactly what I want to think about as we are starting to settle into the Winter months. I designed these butterflies to be traditionally pieced so anyone can make them. This quilt would be so pretty in a special little girls bedroom! Let's get started!
This quilt/project finishes at 94" x 106".
![]()
Fat Quarter bundle Colette
5 yards 33054-14 Leaf for background
1-2/3 yards 33054-13 Violet for Trellis
1/2 yard coordinating brown Bella Solid for butterfly body
1/2 yard 9900-205 Eggplant Bella Solid for Inner Border
1-1/2 yards 33050-14 Violet for the Outer Border
![]()
I found it easiest to pair up my fat quarters in advance and work with pairs. Each pair of fat quarters will yield 4 butterflies (2 tops and 2 bottoms).
WOF stands for width of fabric.
CUTTING INSTRUCTIONS:
Butterflies
|
Background Fabric |
From Each Fat Quarter |
||||
|
Cut Size |
Quantity |
Label |
Cut Size |
Quantity |
Label |
| 7" square |
14 |
B |
1-1/2”X4-1/2” |
4 |
A |
| 2-1/2”x 4-1/2” |
28 |
C |
7” square |
1 |
B |
| 2” square |
112 |
E |
3-1/2”x 5-1/2” |
4 |
D |
| 3-3/8” square |
56 |
H |
3”x 5-1/2” |
4 |
F |
| 2-1/2”x 3” |
28 |
I |
6-1/4” square |
1 |
H |
From the body fabric, cut (28) 2-1/2” x 6” rectangles. Label “G”.
Irish Chain
From the background fabric, cut (56) 4-1/2” squares. Cut (8) 4-1/2” x WOF strips and (14) 2-1/2” x WOF strips.
From the “chain” fabric, cut (4) 4-1/2” x WOF strips and (14) 2-1/2” x WOF strips.
Sewing Instructions
All sewing instructions assume a scant 1/4" seam allowance. We will be making 28 butterfly blocks. The following directions are to make FOUR butterflies. Repeat to make all of the butterflies. Again, I found it easiest to just work with one pair of fat quarters at a time.
1. Locate the pieces marked “H”. Draw a diagonal line on the back of the 3-3/8” squares. Place (2) 3-3/8” squares on top of each of the 6-1/4” squares, right sides together, as shown. The center corners will overlap. Pin as shown.
2. Sew a scant 1/4” seam on each side of the diagonal line as shown.

3. Cut on your drawn diagonal line and press open.

4. Pin a 3-3/8” square to the corner of your partial flying geese. Pin as shown. Repeat for both of the partial flying geese pieces.

5. Sew a scant quarter inch seam on both sides of your drawn line, as shown.

6. Cut on your drawn line and press open. You will now have 8 flying geese units. Square up to 3 x 5-1/2”.

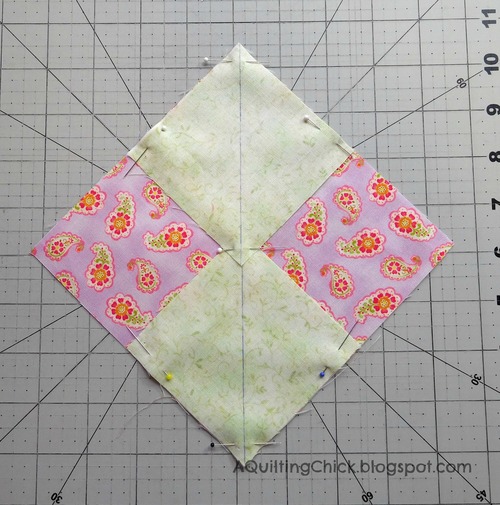
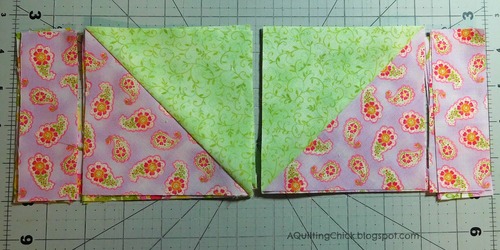
7. Next, locate the pieces marked “B”. Pin one background piece to one fat quarter piece right sides together as shown.

8. Sew around all four sides of your squares as shown. Line up the square on your cutting board, using the 45-degree angle lines.
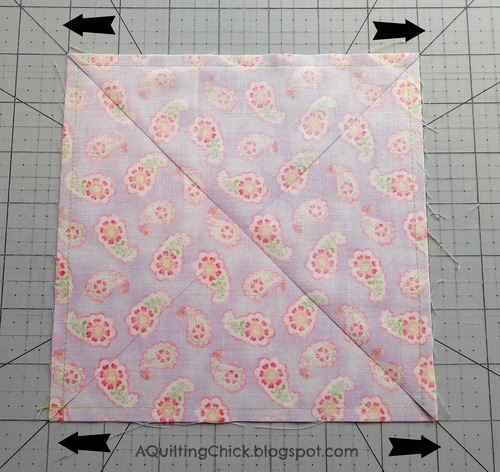
9. Now, cut your squares on both diagonals. Press your half square triangles (HST) open. Square up to 4-1/2”. You will have (8) HST's.

10. Locate your pieces labeled “E”, “F”, and “D”. Draw a diagonal line on the back of all of the “E” pieces. Arrange the “D” and “F” pieces as shown, (2) of each fat quarter in each position, “D” on top and “F” on bottom. Pin one “E” piece to the corner of each “D” and “F” piece, paying special attention to make sure it's on the correct corner. Sew on your drawn line.
11. Trim the corner off as shown and press open. You will have a total of (4) in each position, two of each fat quarter.

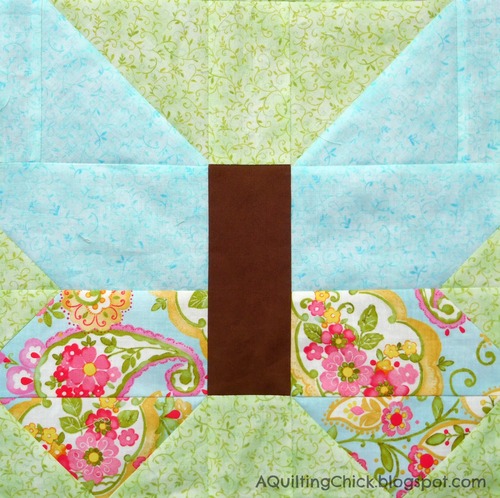
12. Now we're going to assemble the bodies of the butterflies. Locate pieces, “I” and “G”. Place “I” on the top of “G” right sides facing and pin as shown. Sew and press open.

13. Place piece “C” on top of the other end of the “G” piece, right sides facing and pin. Sew and press open.
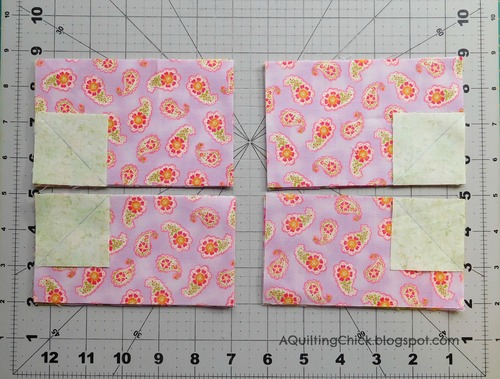
14. Now we're going to start assembling the wings. Locate the pieces marked “A”. We're going to sew them to the sides of the MATCHING HST's, as shown. There will be two of each fat quarter on each side.
15. Flip your “A” piece onto the edge of the HST and pin as shown. Sew and press open.

16. YAY! We're ready to sew our butterflies together. Layout as shown. You want the top two rows to match and the bottom two rows to match.

17. Sew together in columns then join all three columns together. You will have a total of 4 complete butterfly blocks. Repeat these steps to make all 28 butterfly blocks. Your blocks will measure 12-1/2” square.
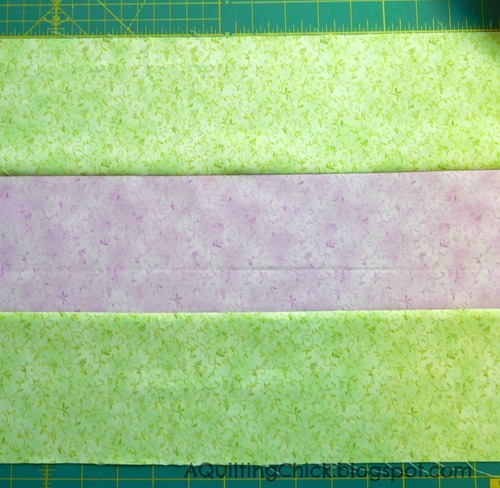
18. Now we are going to make our Irish Chain blocks. Match up (1) 4-1/2” strip of your background and trellis fabrics and pin together, right sides facing, along the long edge. Repeat to use all trellis 4-1/2” strips.

19. Sew together and press open.

20. Pin remaining background 4-1/2” strips to the other side of the trellis 4-1/2” strips as shown.

21. Sew and press open.
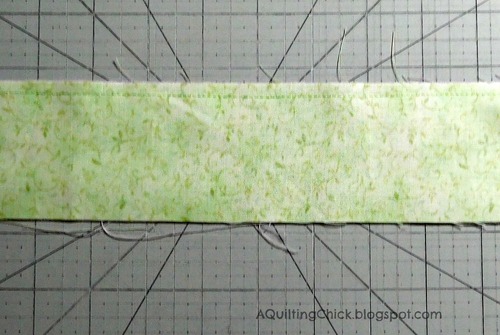
22. Subcut into (28) 4-1/2” strips as shown.

23. Onto the small strips. Pin each of the background 2-1/2” strips to the trellis 2-1/2” strips, right sides facing, along the long edge.
24. Sew and press open.

25. Subcut into (224) 2-1/2” strips as shown.

26. Arrange the 2-1/2” sets into 4 patches as shown. Pin and sew. Press open.

27. Arrange the 4 patches, 4-1/2” squares and 4-1/2” strips as shown. Sew together to make (28) Irish chain blocks. Your blocks will measure 12-1/2” square.

28. Now, arrange your Irish chain and butterfly blocks, alternating placement to make sure the chain stays intact. Try rotating a few butterflies to give your top more motion. Sew your blocks into rows and your rows together to create the center of your quilt.

29. I chose to add a 2-1/2” inner border and a 4-1/2” outer border. Decide what's right for you and your quilt. When adding a border, measure the center of your quilt from top to bottom and from side to side to get your border length measurements.
![]()
This quilt finishes at 94" x 106".

I really love the way this quilt turned out. I think it will look gorgeous in my niece's room. I sure hope you enjoy making this one as much as I did! If you make it, I'd love to see a picture! Please feel free to stop by my blog and look around. :)
Cathy Smith
![]()
Posted in: