Warehouses Closed June 6-13 For Exclusive Event
Cap & Scarf
Cap & Scarf
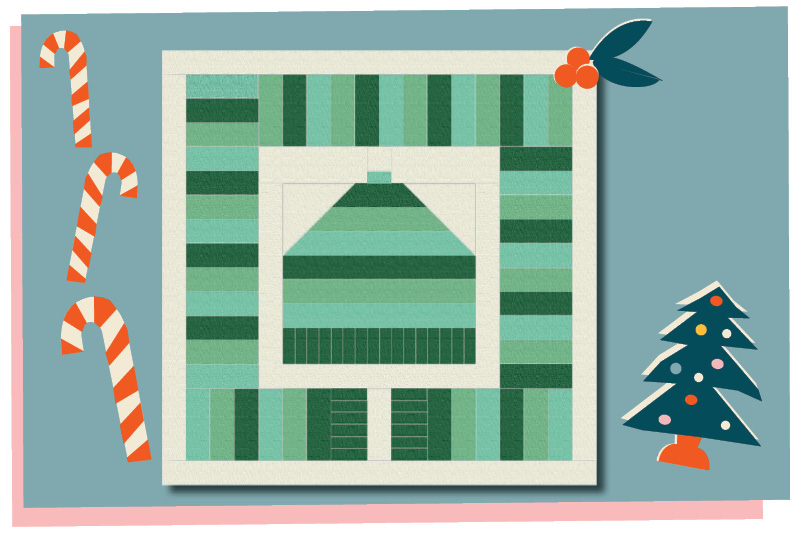
YIELD
18" finished block (18 1/2" unfinished)
INGREDIENTS
From Dill (9900 77), cut:
{G} (16) 1” x 2” rectangles OR (1) 2" x 8½" rectangle
{C} (16) 1½” x 3½” strips
{J} (2) 1½” x 8½” strips
From Betty's Green (9900 121), cut:
{C} (16) 1½” x 3½” strips
{J} (2) 1½” x 8½” strips
From Green (9900 121), cut:
{G} (12) 1” x 2” rectangles OR (2) 2" x 3½" rectangles
{C} (14) 1½” x 3½” strips
{J} (2) 1½” x 8½” strips,
{I} (1) 1” x 1½” rectangle
From Snow (9900 11), cut:
{A} (2) 1½” x 18½” strips
{B} (2) 1½” x 16½” strips
{J} (2) 1½” x 8½” strips
{H} (1) 1.5” square
{D} (1) 1.5” x 10.5” strip
{K} (2) 3.5” squares
{E} (2) 2” x 5” strips
INSTRUCTIONS
Step 1: MAKE CAP
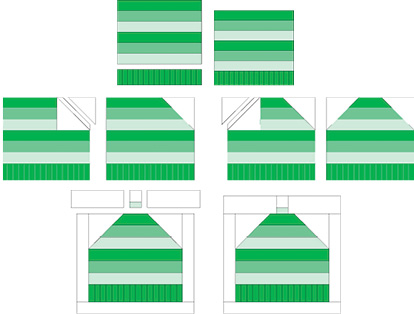
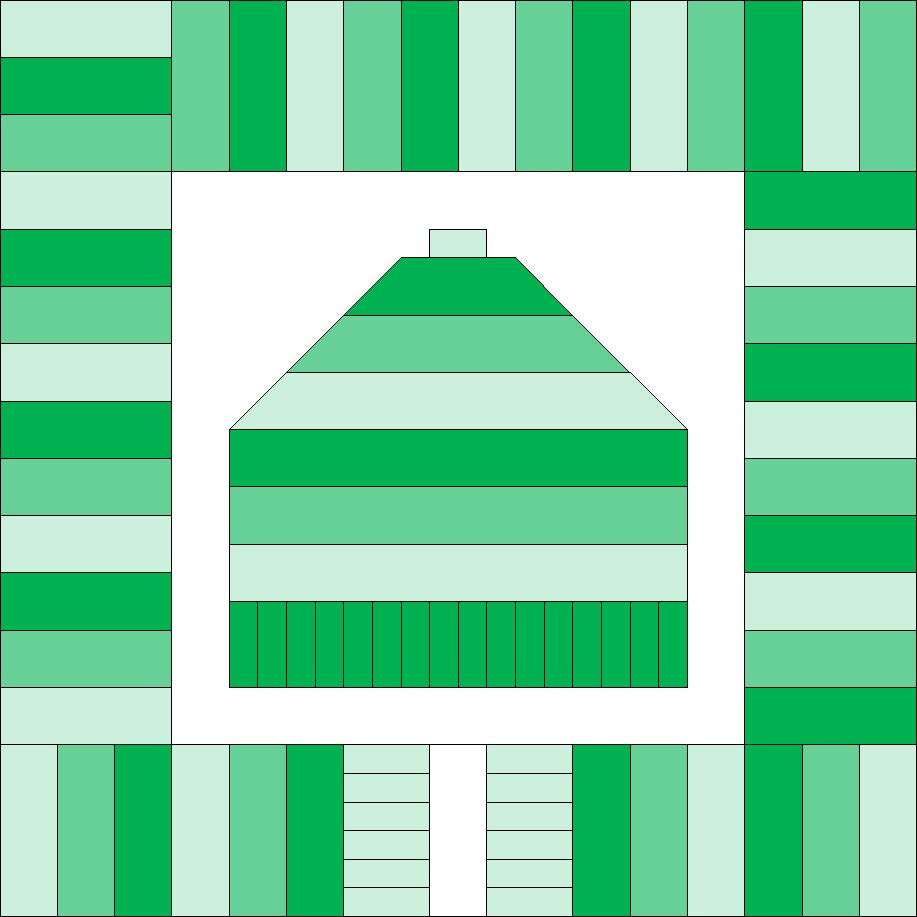
Sew the 1.5” x 8.5” dark, medium and light green strips into a block as shown. Sew the sixteen 1” x 2” rectangles into a strip as shown. This strip should be 8.5” long. Sew the pieced dark green strip to the light green edge of the pieced block.
Place a 3.5” white square on the upper right corner of the striped piece, draw a diagonal line as shown, sew on that line, then trim to a quarter-inch from the seam and press open.
Repeat on the upper left corner.
Sew a 1.5” x 8” white strip to the right and left sides of the cap section. Sew the 1.5” white square to the 1” x 1.5” light green rectangle. Sew the 2” x 5” white strips to the sides of this piece. Sew this strip to the top of the cap section.Sew the 1.5” x 10.5” white strip to the bottom of the cap section.
Step 2: MAKE SCARF
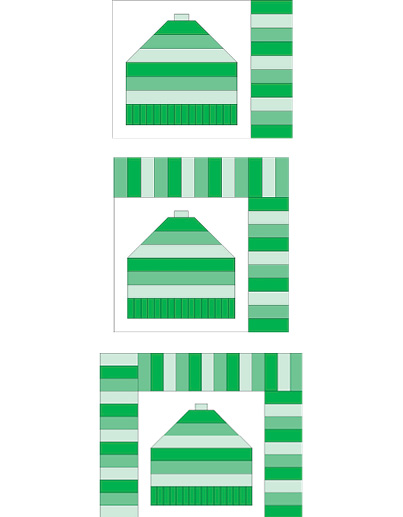
The scarf is made from the 1.5” x 3.5” strips. Sew one segment with 10 strips, alternating the dark, medium and light greens as shown. This strip has four dark, three medium and three light green strips. This segment should be 10.5” long. Sew it to the right side of the cap section.
Sew one segment with 13 strips, alternating the dark, medium and light greens as shown. This strip has four dark, five medium and four light green strips.
This segment should be 13.5” long. Sew it to the top edge of the cap section.
Sew another segment with 13 strips, alternating the dark, medium and light greens as shown. This strip has four dark, four medium and five light green strips.
This segment should also be 13.5” long. Sew it to the left side of the cap section.
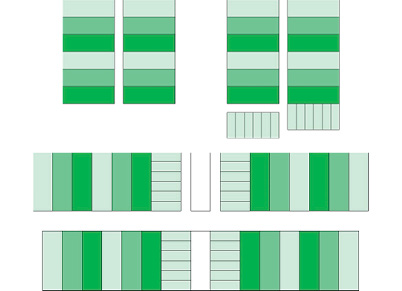
Sew two segments with 6 strips in each, alternating the dark, medium and light greens as shown.
The fringe is made by sewing the 1” x 1.5” light green pieces into two strips of six pieces. This segment should be 3.5” long. Sew one to the end of each of the strips.
Sew the 1.5” x 3.5” white strip between the two fringe strips as shown.
Sew the strip you just made to the bottom edge of the cap section.
Step 3: ASSEMBLE THE BLOCK
At this point, your block should measure 16.5” x 16.5” square. Odds are, it’s close, but we’re all human, and that’s a lot of 1/4” seams to get exactly right. As long as it lays flat, you’re good.
The white border strips allow us to correct for size.
Measure the height of your block, and trim two of the 2.5” x 21” white strips to this length. Sew to the sides of the block.
Sew the two remaining white strips to the top and bottom edges.
Trim your block to 18.5” x 18.5”.
Anne Wiens
---------------------------------------------------
A few things to let you know about the Moda Bake Shop Cozy Little Christmas QAL.
-- For fabric information - https://my.modafabrics.com/inspiration-resources/cozy-little-christmas-faqs
-- To "join", all you need to do is check Moda's Inspiration+Resources page for the latest block. Blocks will be published by 8:30 am CST.
-- The easiest way to find all of the pubished Cozy Little Christmas blocks and blog posts is to use this link - https://my.modafabrics.com/tags/countdowntochristmas2021
-- There will only be three Newsletters sent for the 2021 Moda Bake Shop Countdown to Christmas quilt-along. Those will be sent December 1 - today, December 10, and December 31. The last two will include links to prior blocks and posts so you don't miss anything.
-- We can not "add" you to the Newsletter e-mail list, you must sign up for it here - https://modafabrics.com/inspiration-resources/newsletter.

Comments