Welcome to Moda Fabrics!
Fancy Parlor
Fancy Parlor
Published:
Jan 20 2020 - 22:33

![]()
Seeing the collection Sarah's Story by Betsy Chutchian reminded me the stories my grandmother would tell me of her daily visits to her grand parents farm on her long walks home from school each day in rural Pennsylvania. Of course, Great-Great Grandmother had a fancy parlor, which the children were not permitted to enter. On the back of fancy velvet sofa was a beautiful hand pieced quilt. Because their were 8 children in the family (6 boys and 2 girls) Great-Great Grandmother and Great Grandmother would make quilts of old clothes for the beds. It was of course Pennsylvania Dutch Country with a strong Amish influence. My grandmother's family had not yet arrived in the United States during the time period this collection reflects. My grand mother's family immigrated from Ireland during the Civil War, which is how the family gained their citizenship. The male members of the family were immediately enlisted in the Union Army. I find it amusing that I grew up with these stories long before Hollywood glamorized this practice in various movies. So during this Thanksgiving week let's appreciate, give thanks, and remember to our ancestors and the journeys they took to come to the United States.
![]()
This quilt finishes at 75" x 75" with 18" finished blocks.
- Read the instructions before you begin cutting
- All seams are a scant ¼ inch
- Press and starch fabrics prior to cutting for best results
![]()
- 23 fat quarters of Sarah’s Story by Betsy Chutchian for Moda Fabrics (select at least 12 low volume prints)
- 2.5 yards of background fabric Moda Bella Solid – Ivory – 9900-60)
- 5/8 yard of a print fabric for 3rd border
- 1 1/4 yards of a print fabric for 5th boarder
- 5/8 yard of fabric for binding
- 5 yards of backing fabric
- 80 inches square of batting
![]()
The main portion of the quilt is made from nine 18 inch blocks. I found it easiest to cut and make one block at time in order to determine the cutting and placement of the low volume fabrics to form the secondary design of the squares.
Cutting
- From background fabric, cut (8) 2 x 3.5 inch rectangles (8) 4 inch squares cut diagonally once
- From the fabric for the chain inside the block, cut (5) 3.5 inch squares (12) 2 inch square
- For the center point squares, cut(4)4.75 inch squares
- From the first low volume print, cut (4) 2 x 3.5 inch rectangles (2) 2 x 5 inch rectangles
- From the second low volume print, cut (2) 2 x 5 inch rectangles
- From the third low volume print, cut (2) 2 x 5 inch rectangles
- From the fourth low volume print, cut(2) 2 x 5 inch rectangles
Block Assembly
Corner Chain Units
- For each corner chain unit you will sew one 2 x 3.5 inch rectangle of Ivory to the side of a 3.5 inch chain fabric. Press open. [Unit 1]
- Sew a 2 inch chain fabric to the short end of another 2 x 3.5 inch rectangle of Ivory. Press open. [Unit 2]
- Place Unit 2 along the top edge of Unit 1 with right sides together. Be sure to match seams and sew together. Press open. [Unit 4]
- Place a 2 x 5 inch rectangle of the first low volume fabric right sides together along the right end of Unit 4 formed in the previous step. (it should be on top of Unit 2). Sew together and press open. [Unit 5]
- Sew a 2 inch chain fabric to the short end of another 2 x 5 inch rectangle of the first low volume fabric. Press open. [Unit 6]
- Place Unit 6 along the top edge of Unit 5 with right sides together. Be sure to match seams and sew together. Press open.
- Repeat the steps with the other low volume selections to make a total of 4 Corner Chain Units. Set aside.
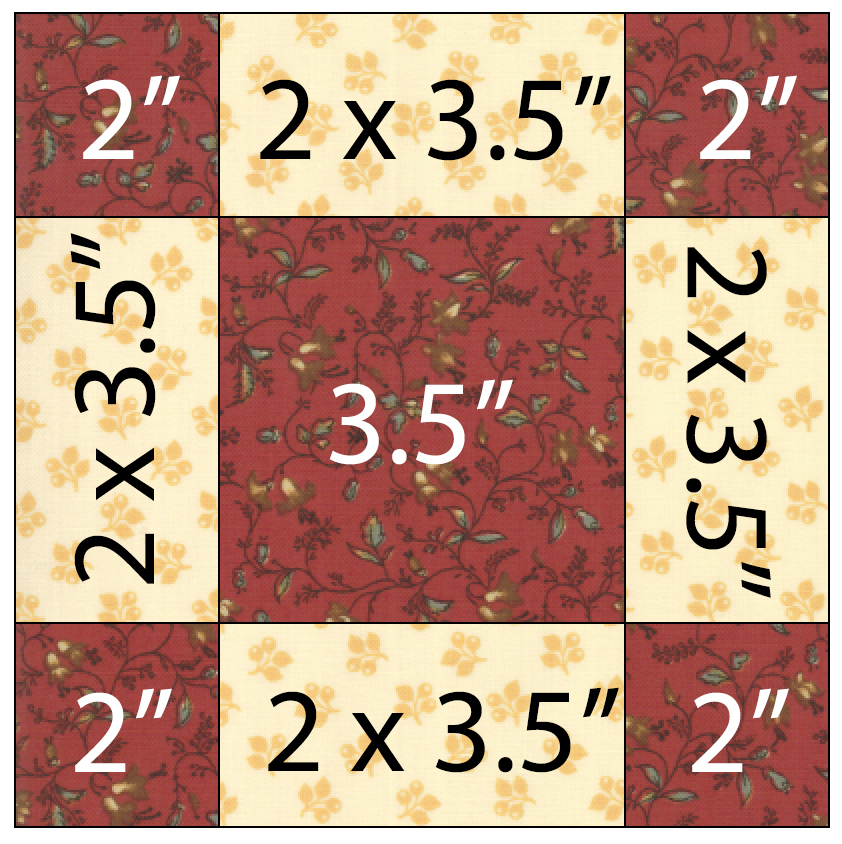
The Corner Chain unit should measure 6.5 inches and look as pictured below: (NOTE: remember each corner unit should have a different low volume)

Make the Center Point Squares For the center point squares of the block you will need:
- 75” square of the print fabric you selected
- 4” square of Ivory fabric cut diagonally once
- Sew the background fabric triangles of the Ivory fabric to the left and right of the center square [E] sewing (using ¼” seam) along the long edge of the triangles. Press open.

- Sew the last two background fabric triangles [D]to the top and bottom of the center square sewing (using ¼” seam) along the long edge of the triangles. Press open.

- The completed Center Point Squares should be trimmed to 6.5”. Make a total of 4.

Make the Center Chain Square
- Sew a 2 x 3.5” Ivory rectangle to left and right sides of the remaining 3.5” chain print square. Press seams open.
- On the two remaining 2 x 3.5’ Ivory rectangles sew a 2” chain print square on each of the ends and press open.
- Sew each strip on the top and bottom of the unit so that the center block looks as follows: (Note: the unit should measure 6.5 inches)
Assemble The Blocks
Sew together the block with the completed units as shown in the diagram below. The finished block should be trimmed to 18.5”.

Repeat with various other fabric combinations to make a total of 9 blocks.
Cutting & Piecing The Borders
Round One:
From the various low volume print fabrics cut: Cut various 2 inches by various lengths of the leftover low volume prints. Piece together to form (2) 2 x 54.5 inch strips and (2) 2 x 57.5 inch strips
From the Ivory background fabric cut & piece:
(2) 2 x 60.5 inch strips (2) 2 x 57.5 inch strips (2) 3 x 64.5 inch strips (2) 3 x 69.5 inch strips
From the first main print fabric cut & piece:
(2) 2.5 x 60.5 inch strips (2) 2.5 x 64.5 inch strips
For the final boarder print cut and piece:
(2) 3.5 x 69.5 inch strips (2) 3.5 x 75.5 inch strips
Assemble The Quilt
Assemble the main section of the Fancy Parlor quilt as shown in the chart below:
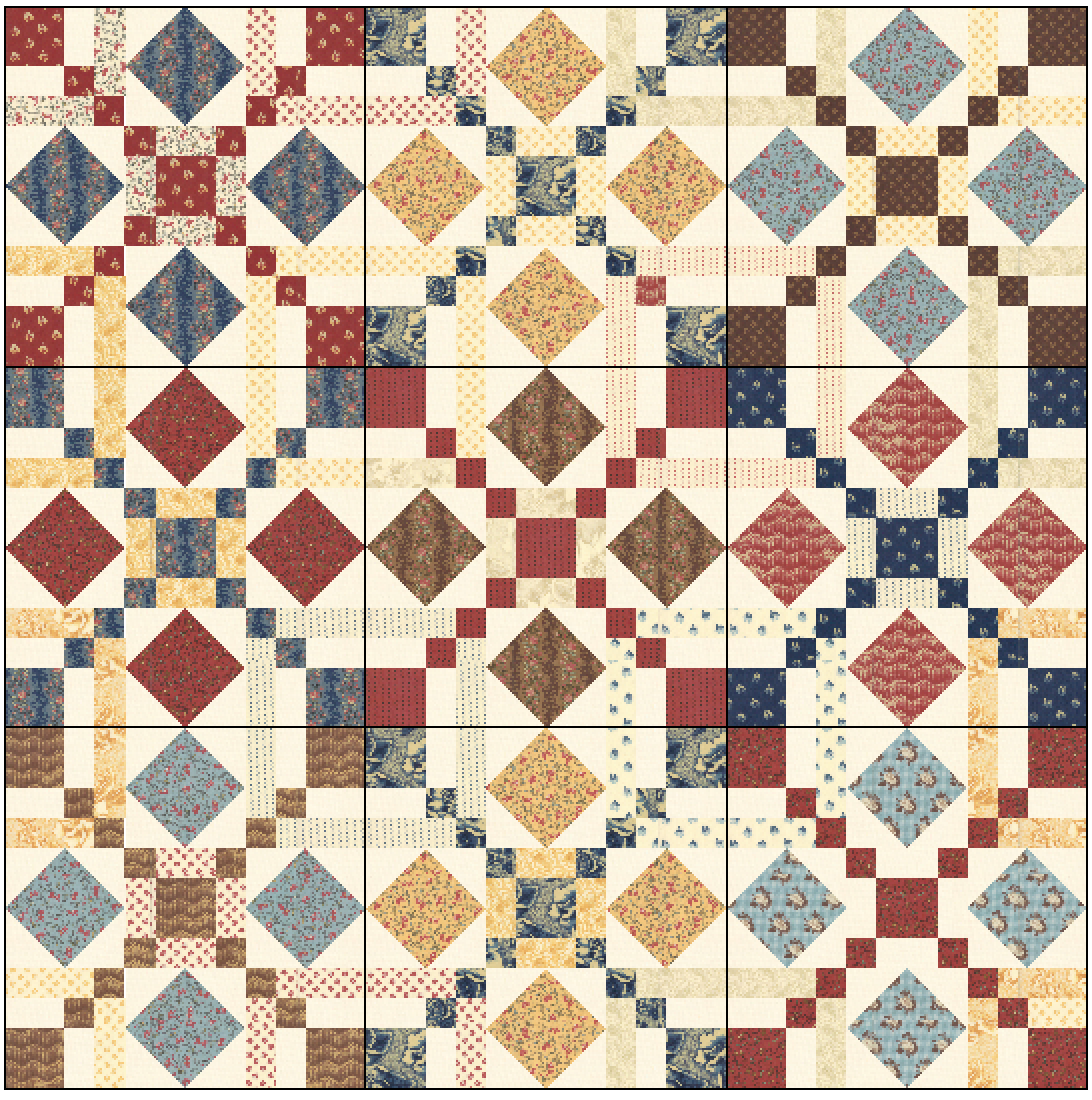
Note that I arranged the various low volumes of the corner pieces to form the secondary design. This is where making one block at a time and design wall comes in handy.
The first border:
Sew the low volume 2 x54.5” strips to the left and right of the quilt. Sew the 2 x 57.5” strips of low volumes onto the top and bottom of the quilt. Press
For the second border:
Sew the 57.5” strips of Ivory onto the top and bottom of the quilt. Press. Sew the 60.5” strips of Ivory onto the left and right sides of the quilt. Press.
For the third border:
Sew the 2.5 x60.5” strips of the first main print on the left and right of the quilt. Press. Sew the 2.5 x 64.5” strips of the first main print to the top and bottom sides of the quilt. Press.
For the forth border:
Sew the 3 x 64.5” strips of Ivory to the top and bottom of the quilt. Press. Sew a 3 x 69.5” strips onto the sides of the quilt. Press.
For the fifth (and final) border:
Sew the 3.5 x 69.5: strips of final border print to the top and bottom of the quilt. Press. Sew the 3.5 x 75.5” strips to the sides of the quilt. Press.
Finishing The Quilt
Quilt as desired, bind, wash, dry and snuggle! The painting above the quilt is of my great-great grandparents home in Pennsylvania.
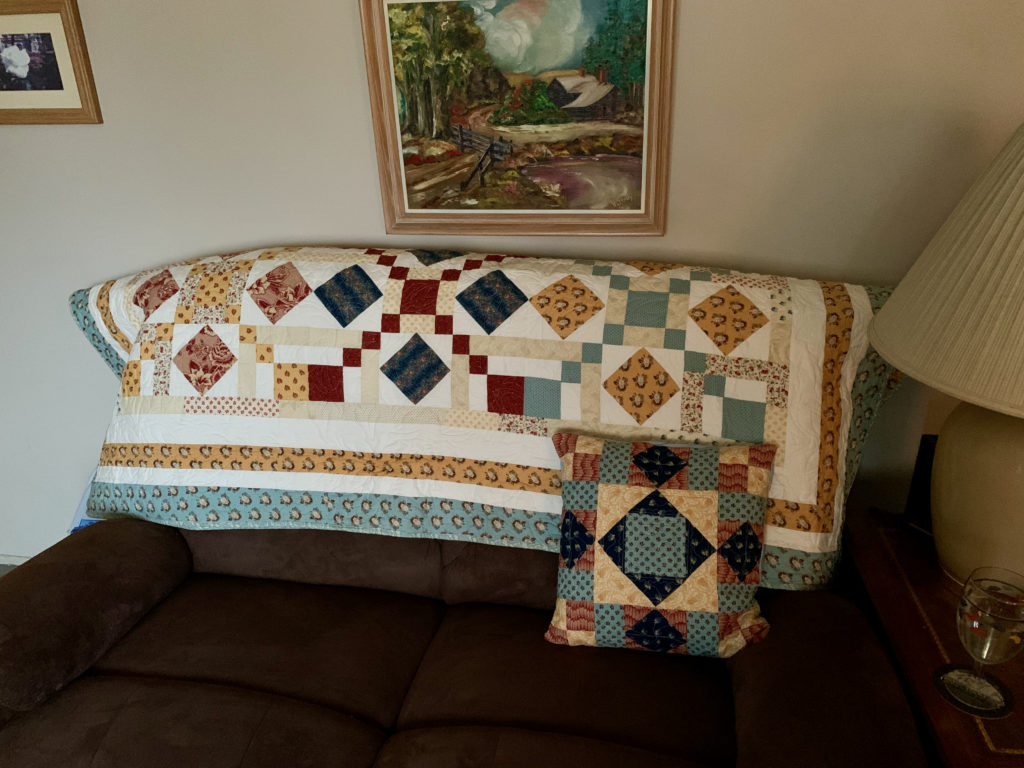
Apparently Lady Anabella decided to be the official quilt tester?!?!

You can even get creative and use an additional block or two to make matching pillows to go with your quilt.
Happy Sewing!
Lisa Jo Girodat Neverlandstitches
Instagram: Neverlandstitches
Facebook: Neverlandstitches by Lisa Jo
Blog: Neverlandstitches by Lisa Jo
Shop: Neverlandstitches by Lisa Jo
PRINTER FRIENDLY VERSION - We know the file is corrupted-gibberish and we're working on getting it replaced.
![]()
Posted in:
Comments