Welcome to Moda Fabrics!
Countdown to Christmas: Wrapped Up
Countdown to Christmas: Wrapped Up
Published:
Dec 16 2017 - 23:00

We're just a week away from Christmas Eve, and chances are your tree is surrounded by piles of brightly-wrapped packages just waiting to be exchanged with loved ones. May I add just one more? I call it "Wrapped Up".
![]()
I am going to make this block using the Split Recs® trim-down tool, designed by Deb Tucker of Studio 180 Design. The tool allows you to make these split rectangle units in several sizes. We will be making 2" x 3.5" units. If you don't have this tool in your collection yet, there's still time to add it to your "wish list".
This quilt block finishes at 6" square.
NOTE FROM ODA MAY: If you don't have this trim tool, you can make this block using Half Rectangle Triangles (HRTs). Cut the green and red into 4" x 2.5" rectangles. Cut on the diagonal. Pair each set and offset corners by 1/4". Sew a scant 1/4" along the long edges. Press. Trim to 2" x 3.5" and proceed with Anne's directions for block assembly.
![]()

For this 6" (finished) block, you will need:
Red Print: Four 2" x 3-1/2" rectangles, and one 4" wide strip that is at least 6" long.
Green: One 4" wide strip that is at least 6" long.
![]()
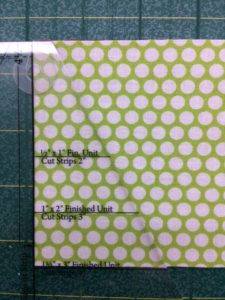
Step 1: To cut the triangles for our Split Recs units, Stack your red and green strips, both right side-up. Square off the left end of the strip stack. Lay the tool on the strips, lining up the left edge of the fabric with the bold vertical line on the ruler. The bottom edge of the fabric should be on the horizontal line that says "1-1/2" x 3" Finished Unit. Cut the triangle from the strip.

Step 2: This cut may be a little confusing. Fortunately, the tool comes with well-illustrated instructions.
Rotate the tool 180° and find the tiny little line that says "2nd trim". Put this line on the bottom edge of your strip, and align the slanted edge with the end of your strip. Cut the triangle from the strip.
Now you have a straight edge on your fabric.
Repeat steps 1 and 2, so you have four green and four red triangles.

Step 3. Sew the green and red triangles into rectangles.
Lay the red triangle on top of the green, aligning the bias edges. Offset the ends of the piece so that your seam begins and ends in a notch 1/4" from the bias edge.
Note: With the Split Recs tool, "really close" is good enough for this seam.
I like to press my seams open. Press to the darker fabric, if you prefer.
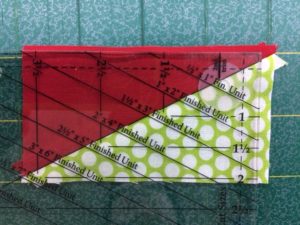
Step 4. At this point, our Split Recs are a little larger than we need them to be, so we use the tool to trim them down.
Lay the tool on your piece, lining up the SW-NE diagonal line on the seam. Notice that the left edge extends beyond the 3-1/2" line and the bottom edge is below the 2" line. Trim the right and top edges.

Step 5. Rotate the Split Rec unit 180° and lay the tool back down, aligning the diagonal line on the seam. Notice that this time, the left end is lined up with the 3-1/2" line, and the bottom edge is on the 2" line. Trim the right and top edges.
Just so you know: The NW-SE diagonal lines on the tool are for trimming units that slant the opposite direction.
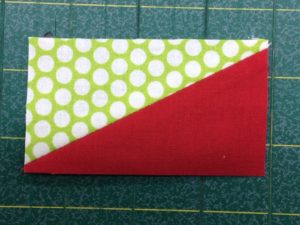
At this point, the diagonal seam does not run directly into the corners of the unit. This is correct. They are offset to allow for the next seams.
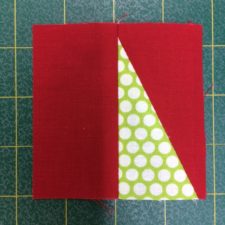
Step 6. Sew the Split Recs units to the 2" x 3-1/2" red rectangles to make four quarter-units. Be sure they look like this:
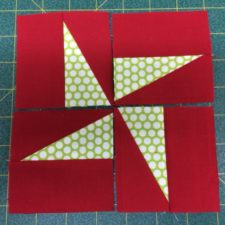
Step 7. Lay out your quarter-units, rotating them so that the green triangles for a "bow" in the center. Sew the quarter-units together into a 6-1/2" block.
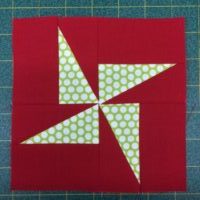
And that wraps up today's Countdown to Christmas block, "Wrapped Up".
![]()
This block finishes at 6" x 6".
My blog "Seams Like a Plan", features scrap quilt blocks and proy also "Like" my Facebook page.

Anyone in my family can tell you that I am not the world's greatest cook, but I am whipping up a Christmas Goose to share with you on Christmas Eve, right here in the Moda Bake Shop.
Until then, I wish you a blessed holiday season.
Anne Wiens
{sweetgrassdesigns.wordpress.com}
![]()
Posted in:
Comments