Welcome to Moda Fabrics!
Grandma's Dominoes Quilt
Grandma's Dominoes Quilt
Published:
Jul 11 2015 - 23:00


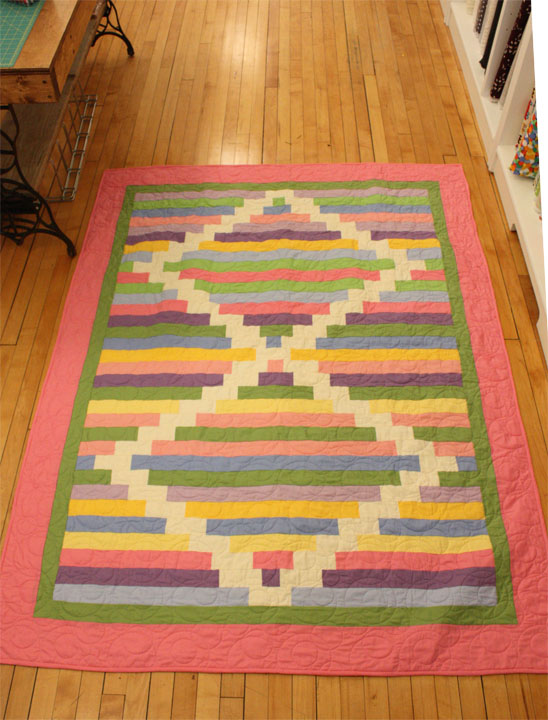
I love memory quilts made from the clothing of a loved one. One day I found myself feeling discouraged that I probably would never have the opportunity to make one of the quilts since my loved ones still need their clothing. Then I realized that there was more than one way to make a memory quilt. One of my favorite things to do when I visited my grandma’s house was to make elaborate domino chains with my sister. The white squares in this quilt representative of those domino chains. I plan to embroider dots with the birthdays of all of her children, grandchildren, and great-grandchildren into the white squares before I give this quilt to my grandma. This quilt would also be perfect for a guest book for a special occasion such as a graduation, wedding, baby shower, or anniversary.
![]()

1 Jelly Roll (I used 1930s Bella Solids)
1 Bella Solids Charm Pack OR ¾ yd solid fabric (I used Bella Snow)
1 yard for first border (I used Bella Solids Grass)
2 yards for second border (I used Bella Solids 30s Pink)
4 yards for backing
![]()
From first border fabric: Cut (7) 2.5” x WOF strips
From second border fabric: Cut (7) 5” x WOF strips
Cut (7) 2.5” x WOF strips for binding
From 32 charm squares cut (64) 2.5”x5” rectangles
*If using yardage cut (8) 2.5” strips. Subcut into (64) 2.5” x 5” rectangles. You should get (8) rectangles from each strip.
Don't be scared. The next steps look complicated, but each row is made from 1 strip from the jelly roll. Each step is cut into three pieces. The two outer pieces will be the same length and the third piece will be in the middle of the row. (Row A is the exception. You're strip will be cut into two pieces with one rectangle in the middle. Add 2.5" squares to each side to make the row the same length as Rows B-I.)
Row A: Cut (3) strips into (2) 21” pieces
For each row cut (2) 2.5” squares of matching fabric
*You will not use all of the strips from your jelly roll for this quilt. Most Jelly rolls will have a few duplicates. Use these for Row A and cut 2.5” squares from the duplicate.
Row B: cut (4) strips into (1) 2.5” and (2) 20” pieces
Row C: Cut (4) strips into (1) 5” and (2) 18.5” pieces
Row D: Cut (4) strips into (1) 10” and (2) 16” pieces
Row E: Cut (4) strips into (1) 15” and (2) 13.5” pieces
Row F: Cut (4) strips into (1) 20” and (2) 11” pieces
Row G: Cut (4) strips into (1) 25” and (2) 8.5” pieces
Row H: Cut (4) strips into (1) 30” and (2) 6” pieces
Row I: Cut (2) strips into (1) 35” and (2) 3.5” pieces
Break out the dishes for this bakeshop recipe! Place all of the pieces for one row on a paper plate to keep things organized as you assemble the rows. I recommend labeling the plates to make assembling the top easier.

Assembly
Row A: Sew 2.5” square to end of each strip. Sew white rectangle between strips to create one long row.
Rows B-I: Sew white rectangles to each side of the single sized cut from jelly roll. The remaining two pieces from jelly roll should be the same length and are sewn to the other side of white rectangles.

Sew rows together as shown.
(A-B-C-D-E-F-G-H-I-H-G-F-E-D-C-B-A-B-C-D-E-F-G-H-I-H-G-F-E-D-C-B-A)
*I avoid using pins when possible, but I recommend pinning at least the middle and end of each strip to avoid fabric shifting.
For both border fabrics sew (2) pairs of strips together. Cut (1) strip in half and sew to remaining strips. The inner border is 2.5” wide and the outer border is 5” wide.
Measure length and width in at least three places (middle and each side), average the measurements (add the 3 measurements together and then divide by 3), and border strips to length. Begin by placing a pin in the middle and at each end and pin every few inches so that fabric is fairly even. Sew long sides first. Press and attach borders to short sides using same method. Repeat for second border.
Quilt and bind as desired. I chose to do an all-over pattern of various sized circles and used the (7)2.5” strips from second border fabric to bind the quilt.
![]()
60" x 70" Quilt
Kymberley Pease
{peasinapodcreations.blogspot.com}
![]()
Posted in: