Welcome to Moda Fabrics!
Birds of Paradise
Birds of Paradise
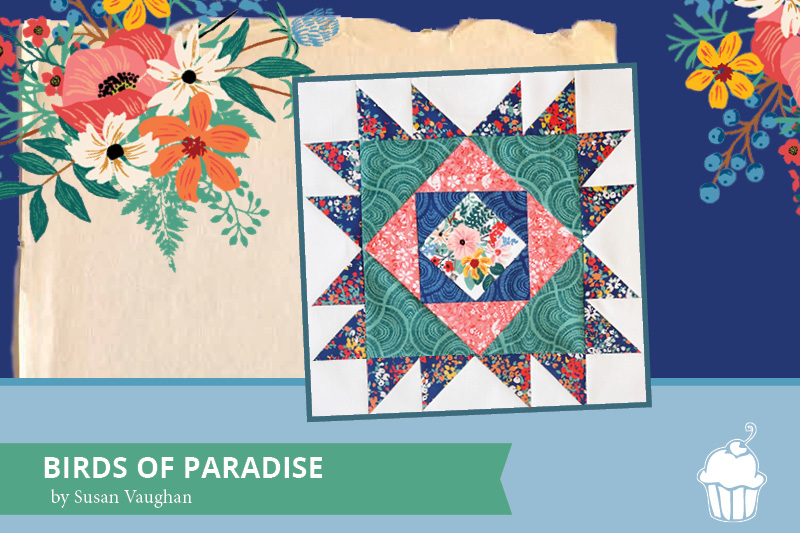
Living in Southern California, we are fortunate to have flowers blooming year-round. One of my favorite things to do, is sit outside in the morning and drink my cup of coffee looking out into my garden. We always have something in bloom, but my favorite is when the Birds of Paradise start to open up.
Be sure to print the pattern for a BONUS block that can be made at 4" or 6".
![]()
6" or 12" block
![]()
6” BLOCK
From Fabric 1, cut:
{A} (8) 1½” squares
{B} (4) 2” squares
From Fabric 2, cut:
{C} (2) 3½” squares cut in half along the diagonal*
From Fabric 3, cut:
{D} (2) 2 3/4” squares - cut in half along the diagonal*
From Fabric 4, cut:
{A} (4) 1½” squares
From Fabric 5, cut:
{E} (1) 2 ¾” square
From Background Fabric, cut:
{B} (4) 2” squares
{A} (4) 1½” squares
{F} (4) 1½” x 2½” rectangles
12” BLOCK
From Fabric 1, cut:
{A} (8) 2½” squares
{B} (4) 3” squares
From Fabric 2, cut:
{C} (2) 5¼” squares cut in half along the diagonal*
From Fabric 3, cut:
{D} (2) 4” squares - cut in half along the diagonal*
From Fabric 4, cut:
{A} (4) 2½” squares
From Fabric 5, cut:
{E} (1) 4½” square
From Background Fabric, cut:
{B} (4) 3” squares
{A} (4) 2½” squares
{F} (4) 2½” x 4½” rectangles
![]()
STEP 1. MAKE FLYING GEESE
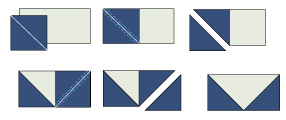
Draw a diagonal line on the back of {A} background squares. With right sides together, layer one {A}
square on the top right corner of an {F} rectangle. Sew on the line, trim, and press out. Repeat on the opposite corner to form a flying geese unit.
Make 4.
STEP 2. MAKE HALF SQUARE TRIANGLES
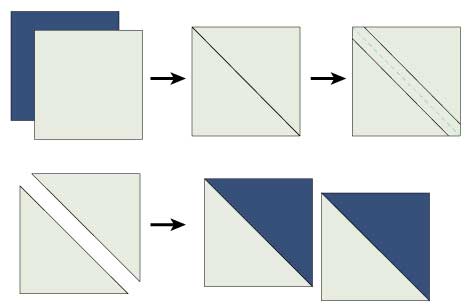
Draw a line on the back of {B} background squares. With right sides together, layer one Fabric 1 {B} square with background square. Sew ¼” on each side of marked lines. Cut along the diagonal line. Press to the darker fabric and trim squares to 2½” square (for 12” block) or 1½” square (for 6” block).
Repeat to make (8) half square triangles.
STEP 3. MAKE CENTER
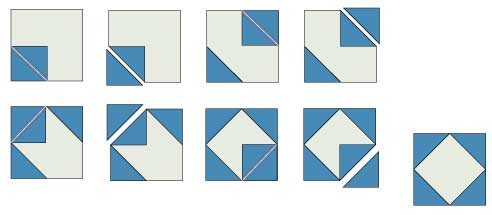
Draw a diagonal line on the back of {A} squares. With right sides together, layer one {A} square on the top right corner of a {E} square. Sew on the line, trim, and press out. Repeat on remaining 3 corners.
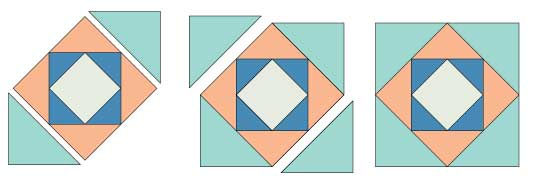
Attach {D}] triangles to the sides of the unit created above. Once all four triangles are added, trim block to ¼” beyond the point. My squares measure approximately 6 1/8” square for the 12” block and 3 3/8” square for the 6” block. Your measurements will vary depending on your seam allowance. The ¼” seam allowance is more important than the actual measurement.

Attach {C} triangles to the sides of the unit created in above. Once all four triangles are added, trim block to 8 ½” (for 12” block) or 4.5” (for 6” block). Your ¼” seam allowance might be slightly larger than ¼” but this will ensure your block comes out to the proper size when finished.
STEP 4. ASSEMBLE BLOCK
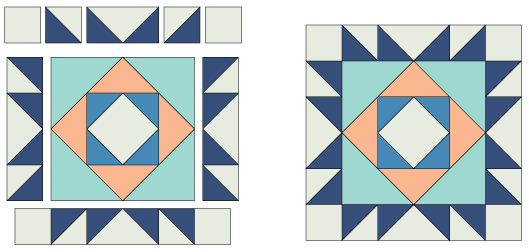
Arrange units according to block diagram. Sew units into rows, and sew rows together to form block. Press seams open to create a flatter block. Block measures 12½” unfinished or 6½” unfinished.
Susan Vaughan
instagram: @thefeltedpear
Please note that there is a CORRECTION - on the 12" block, piece D should be Cut 2 - 4" squares.
Find all Summer in the Garden posts by clicking {HERE}.

Comments