Welcome to Moda Fabrics!
Cottage Stars Quilt
Cottage Stars Quilt
Published:
Nov 20 2017 - 23:00

![]()
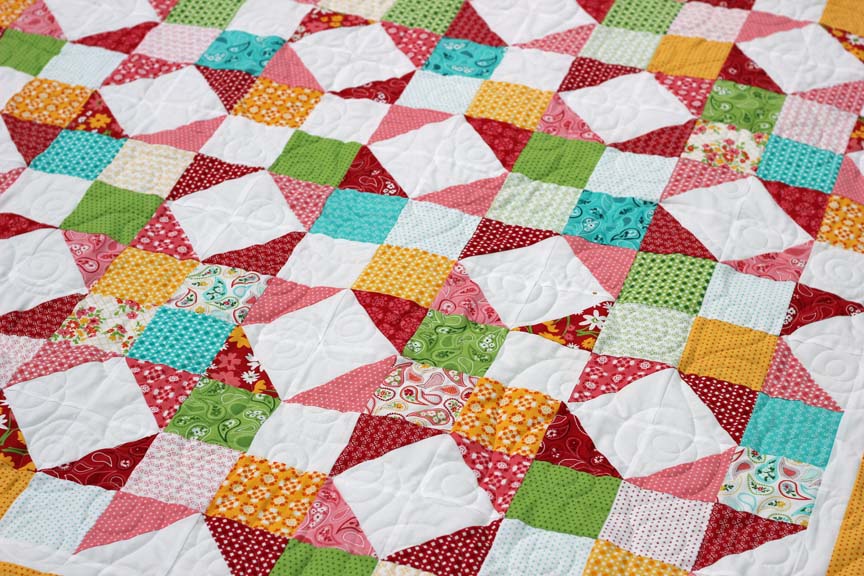
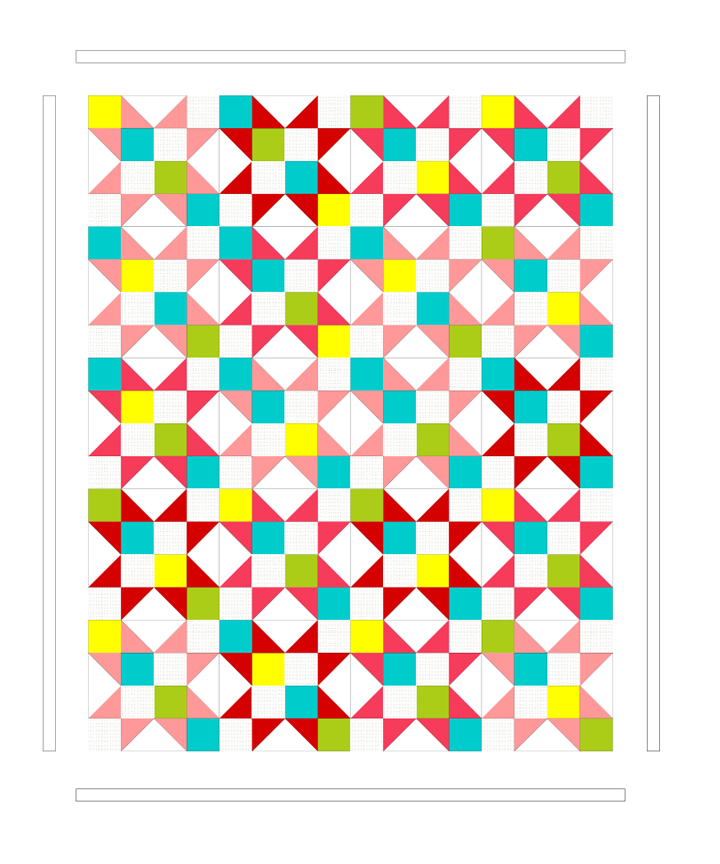
Hi! I'm Kristina from Center Street Quilts and I'm excited to be back with you today sharing a new quilt tutorial: Cottage Stars. Cottage Stars is based on a variation of the Sawtooth Star and goes together quickly using pre-cut Layer Cake squares. I used April Rosenthal's new Mama's Cottage fabric line and it's so bright and cheerful--perfect for getting you through those long winter months. ;)
Stay tuned reading through the end--I have info about a giveaway I'm doing with some extra Mama's Cottage fabric!
This quilt finishes at 77" x 93".
![]()

2 Layer Cakes -- or (60) 10" x 10" Layer Cake squares
2 yards background fabric {Bella Solid Off White 9900 200}
1 1/3 yards border fabric
6 yards backing fabric
3/4 yard binding fabric
![]()
Please note before starting:
- Read through all instructions first
- All seams are 1/4”
- Width of fabric is assumed to be 42”
- Width of fabric is abbreviated as WOF
Before beginning, the Layer Cake squares first need to be sorted for different parts of the block. The color of the squares can be strategically chosen to make the points on the star pop and to create the look of diagonal lines across the quilt. Alternatively, the prints chosen for each part of the block can be a random assortment for a scrappy look. For this Cottage Star quilt, the red and pink prints were chosen for the points of the stars; the yellow, green, and blue prints for the squares going diagonal one way; and low volume prints for the squares going diagonal the opposite way.

Cutting Instructions:
Choose (20) Layer Cake Squares to be the points on the stars. Set these (20) squares to the side.
Choose (40) Layer Cake Squares to be the smaller squares in the Cottage Square block (these are the yellow, green, blue, and low volume prints in the block diagram above). Cut each of these (40) 10” x 10” Layer Cake squares into (4) 4.5” x 4.5” squares for a total of (160) 4.5” x 4.5” squares.
Background fabric:
- Cut (5) 10” x WOF strips. Subcut into (20) 10” x 10” squares
- Cut (8) 2” x WOF strips for small inner border.
Patterned Outer Border Fabric:
- Cut (8) 5.5” x WOF strips for the large outer border.
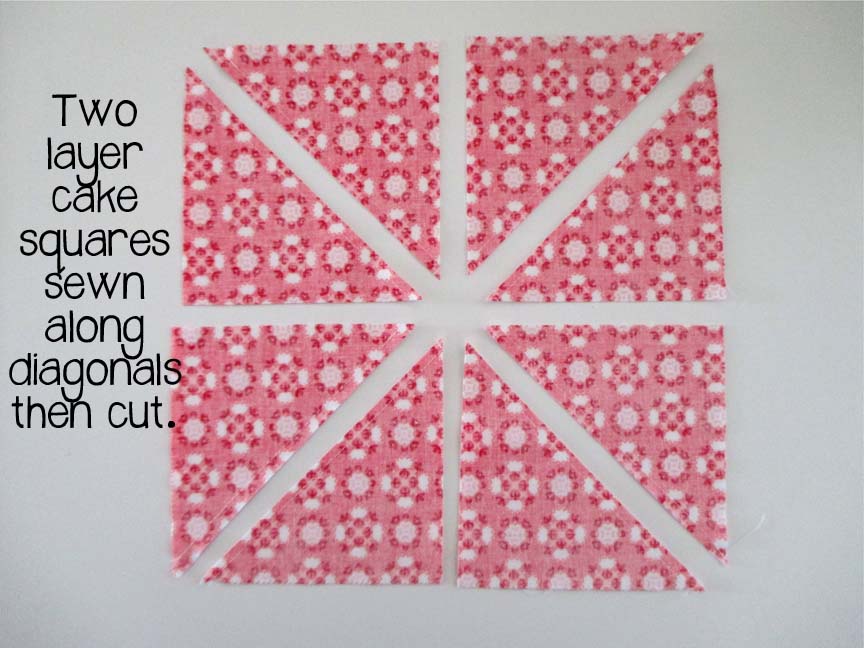
Making Half Square Triangles for the points of the stars:
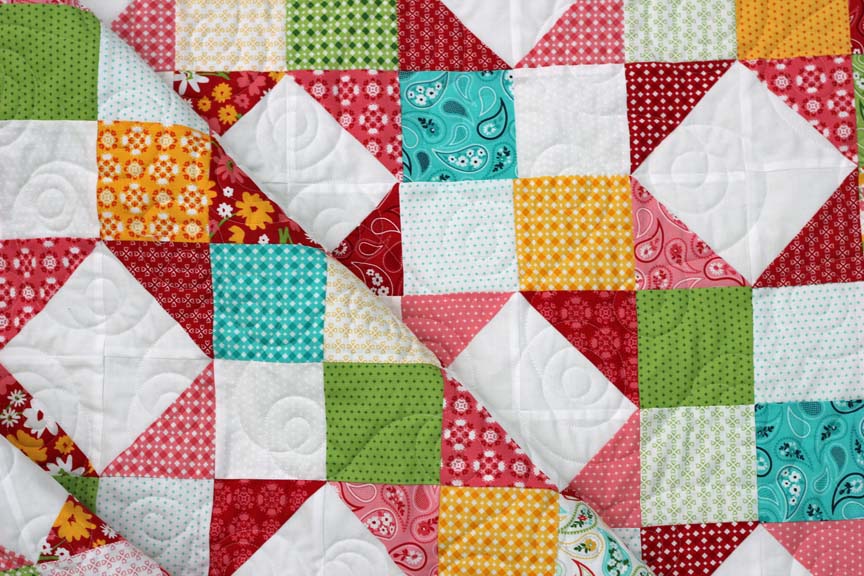
Gather the (20) Layer Cake Squares that will be the points of the stars and the (20) 10” x 10” squares cut from the background fabric. Pair each Layer Cake Square with one background square and follow the diagram below to create (8) half-square triangles (HSTs) from each pair. Press seams toward the darker fabric and trim each HST to 4.5”x 4.5” to yield (160) total HSTs.


Block Assembly:
Each block is made of (8) HSTs and (8) 4.5” x 4.5” squares and there are (20) blocks total in the quilt.
Assemble the first block following the photos below:

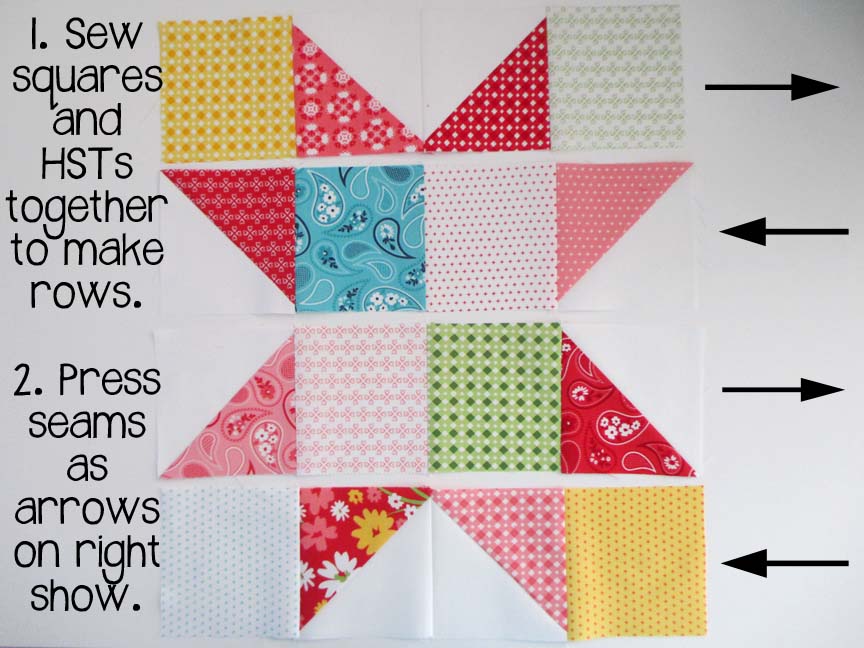
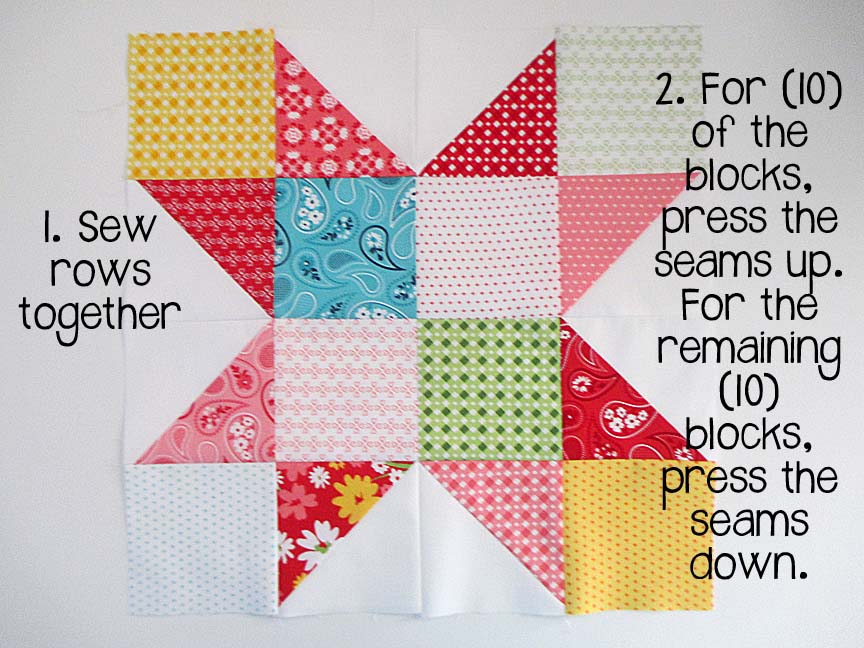
Repeat for a total of (20) blocks. Remember, for (10) of the blocks press the horizontal seams connecting the rows up and for the remaining (10) press the seams down.
Assemble the quilt top:
Assemble the quilt top by laying out the blocks together in a 4 x 5 grid as shown below, alternating the blocks with seams pressed up and the blocks with seams pressed down. By alternating the blocks on each row, the seams between the blocks should nest nicely. The first two rows in the diagram below have arrows over the blocks to demonstrate the alternating pressed seam placement. (As a side note: if there aren't any directional prints, the blocks can be rotated upside down, as long as you keep the seams in an alternating pattern.) Once the seams are arranged correctly, sew each row together. As each row is assembled, press seams according to the arrows shown to the right.

Adding the borders:
Gather the (8) 2” x WOF strips cut out of the background fabric for the small, inner border. Sew together in pairs to yield (4) 2” x 84” strips. Sew one strip to left side and one strip to the right side of the quilt top. Press seams toward border and trim excess border that extends beyond the quilt top. Sew the final two 2” x 84” strips to the top and bottom of the quilt top. Press seams toward border and trim any excess length from border strips.
Gather the (8) 5.5” x WOF strips cut out of patterned fabric for the large, outer border. Sew together in pairs to yield (4) 5.5” x 84” strips. Sew one strip to left side and one strip to the right side of the quilt top. Press seams toward the outer border and trim excess border that extends beyond the quilt top. Sew the final two 5.5” x 84” strips to the top and bottom of the quilt top. Press seams toward outer border and trim any excess length from border strips.

Quilt and bind as desired.
![]()
This quilt finishes at 77" x 93".


Thanks for following along with my Cottage Stars quilt tutorial! If you make your own Cottage Stars quilt, please tag your photos on social media with the hashtags #centerstreetquilts and #cottagestarsquilt as I'd love to see your version!
Now, on to the giveaway. :) After I finished my Cottage Stars quilt, I had some extra Mama's Cottage fabric left over and I want to share it with one of you!! You can enter by heading to my instagram account (@centerstreetquilts) or my blog Center Street Quilts and leaving a comment for me on my Cottage Stars quilt post. I'll pick a winner from all of the comments in a couple days! Good luck and happy sewing!
Kristina
Center Street Quilts
![]()
Posted in:
Comments