Welcome to Moda Fabrics!
Blockheads ~ Block 14
Blockheads ~ Block 14
Published:
Jun 6 2017 - 22:00
June! Can you believe it? We're three months into the Blockheads and... so far, I'm still caught up.
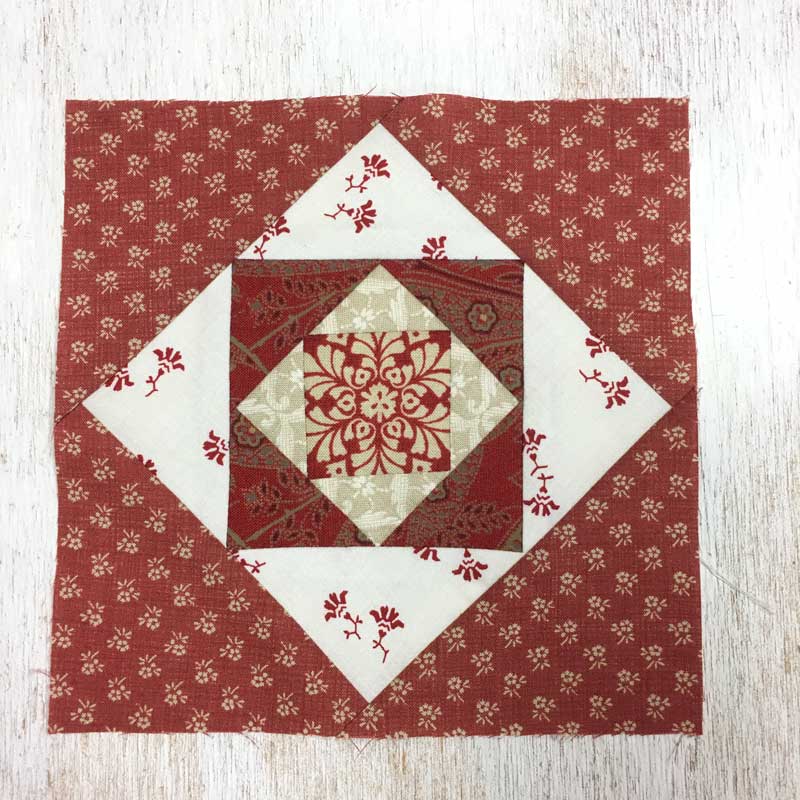
So is Tammy. This beautiful block is made with assorted prints from her collection of French General scraps - there are at least four collections represented. (Making mental note to start hoarding French General scraps...)
This week - Betsy Chutchian has a classic Square in a Square block. Okay, maybe it's a square in a square in a square in a square in a square... you knew I was going to do that, right?
The good news is that it's fairly easy - the hardest part is picking fabrics.
CLICK HERE for the link to Betsy's Block 14 - Square in a Square Block.
Tammy is really caught up - with both sets of blocks. The center of this one is Coral Bells by Jan Patek and the rest of the prints are from assorted collections.
One thing to note on the diagrams shown with the instructions - the blocks show the corner-points of the triangle right at the edge of the block. There should be a 1/4" seam allowance showing - make sure you do not trim the block to the point ~ leave a seam allowance!
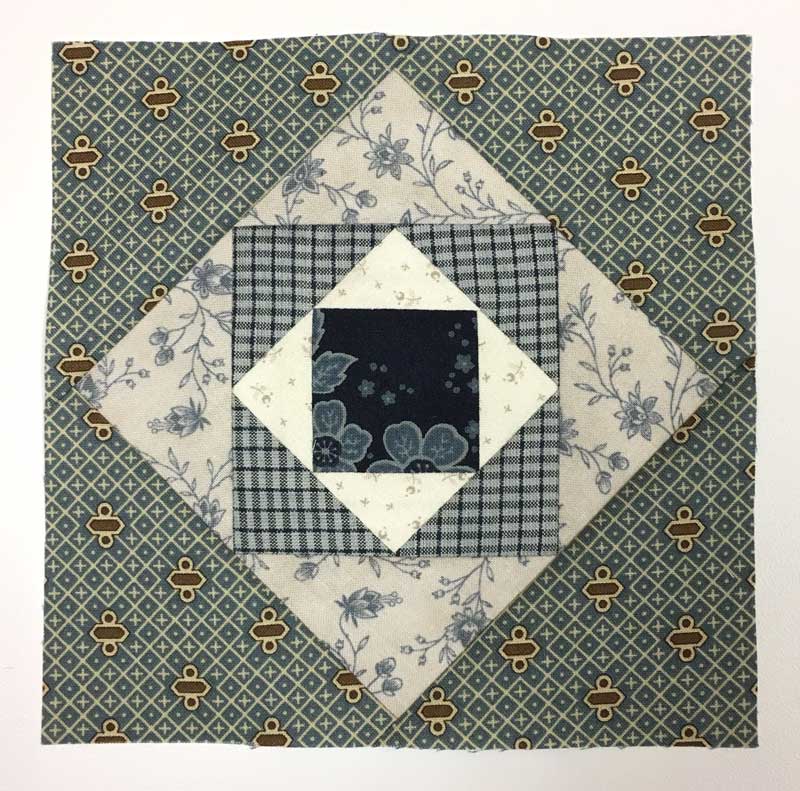
This is my blue Reproducction version - Snowberry by 3 Sisters, Alice's Scrapbag by Barbara Brackman and Rachel Remembered by Betsy Chutchian.
For trimming the blocks to size, there are a couple of tricks that might help make it a little easier. I've always used the lines on the ruler to keep the points straight and centered. The lines I use are the middle points for the finished size of the block - yes, it's a math thing.
- Step 1 - Trim to 2-5/8" - align the points with the a-skosh-over 1-1/4" lines. (My ruler has those measurements, doesn't yours?)
- Step 2 -Trim to 3-1/2" - align the points with the 1-3/4" lines.
- Step 3 -Trim to 4-3/4" - align the points with the 2-3/8" lines.
- Step 4 -Trim to 6-1/2" - align the points with the 3-1/4" lines.
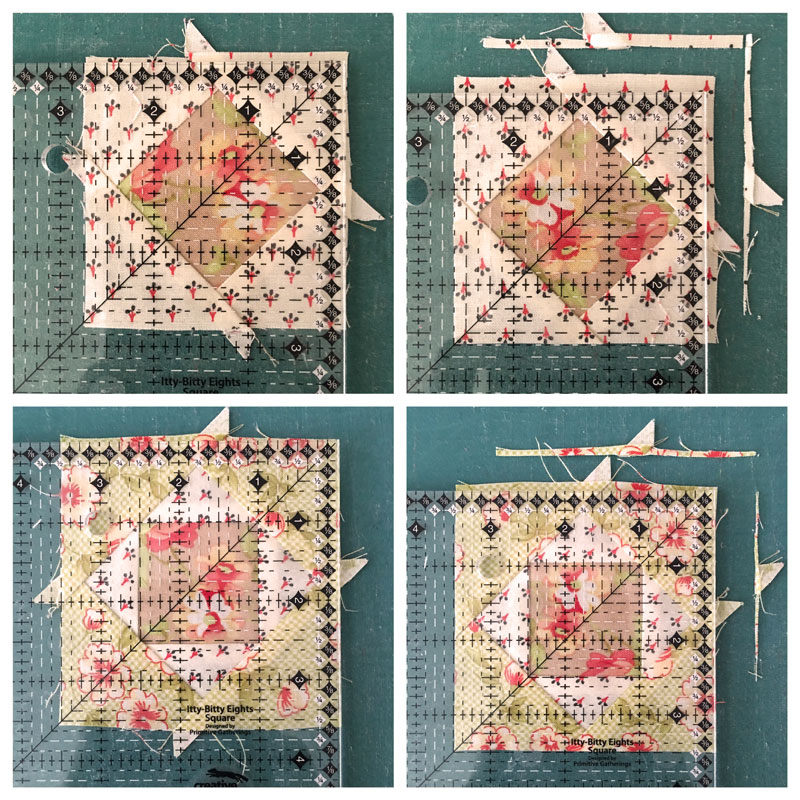
The top row is the Step 1 trimming - trim to 2-3/8". The points are lined up on the ruler between 1-1/4" and 1-3/8" horizontally and vertically. Step 2 - the 1-3/4" lines are across the points horizontally and vertically.

For Step 3, aligning the 2-3/8" lines will center the inside square so that the block can be trimmed to 4-3/4".
Math. I honestly didn't think I'd ever use it as much as I do. Silly me.
Question of the Week ~ When you teach classes or workshops, is there one tip that you always share?
Have fun. Enjoy the process.
It sounds silly, and maybe a bit over-simplified, but one of the first lessons I learned when I started teaching classes was that too many of us put much pressure on ourselves to do everything perfectly. Everything! Going to class is already disruptive - your tools aren't where they normally are, the seat probably isn't the most comfortable and there's a whole lot of chatting and noise happening! So relaxing, having fun and enjoying the process is always the most important message I want to share.
And that I make plenty of mistakes when I'm sewing.

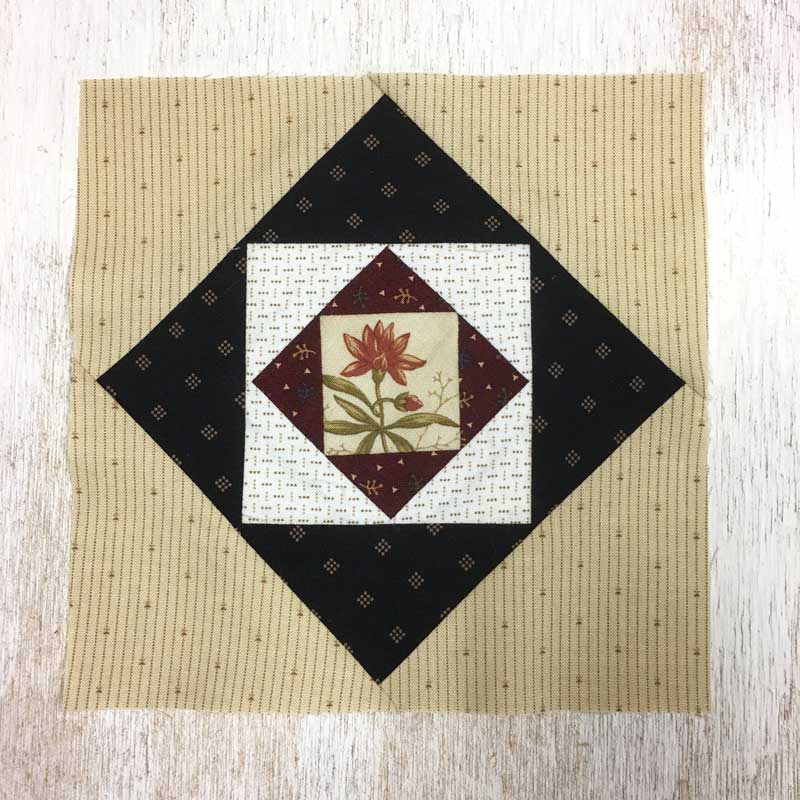
But not on this block - it really is square even though it doesn't look like it. I think it's mocking me. The fabrics? They are from the Farmhouse and Chestnut Street collections by Fig Tree & Co. (I didn't need a reminder to hoard these.)
Just in case you missed it - CLICK HERE to get the link to Block 14 - Betsy's Square In A Square.
If nothing else, you'll want to see Betsy's Penny Block for this week.
That's it for today, June 7. Be sure to visit Lynne, Jo, Jan and Lisa to see their blocks and what other good things they might have made:
- Lynne’s Blog / Facebook / Website
- Betsy’s Blog / Facebook / Instagram
- Jo’s Blog / Instagram
- Jan’s Blog / Website
- Lisa’s Blog / Website / Instagram
Be sure to see the blocks being posted to #modablockheads on Instagram and Facebook. If you're not already a member, you can also join the fun in the Moda Blockheads Facebook group. It's a busy group with folks sharing tips, suggestions and support.
Happy Blockhead Wednesday!
Posted in:
Comments