Welcome to Moda Fabrics!
Shining Bright Quilt
Shining Bright Quilt
Published:
May 25 2017 - 23:00


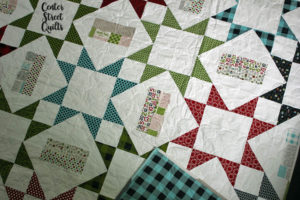
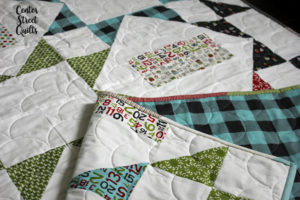
Hi! I'm Kristina from Center Street Quilts and I'm excited to be back at the Moda Bake Shop today sharing my Shining Bright pattern. The quilt top uses a Layer Cake plus background fabric and only has nine jumbo-sized 24” blocks, making the quilt sew together surprisingly fast.
This quilt finishes at 72" x 72".
![]()
I was thrilled to be able to use Sweetwater's Hometown Christmas Edition fabric for this quilt! It's such a fun fabric line and you'll definitely want to get your hands on some of it for a Holiday project!
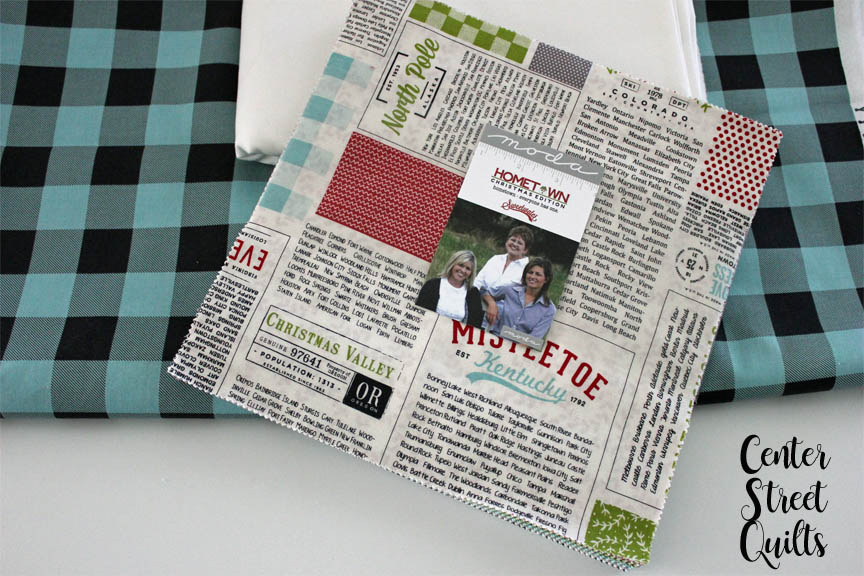
1 Layer Cake® {Sweetwater's Hometown Christmas Edition}
3 1/2 yards background fabric {Bella Solids 9900 97}
4 1/2 yards backing fabric {Blue Buffalo Check SKU 5667 26}
2/3 yards binding fabric {or, you can use ten of the extra Layer Cake squares for a scrappy binding}
![]()
First, we'll sort our Layer Cake squares so we know which ones we'll be using for each part of the quilt. For the quilt top, we'll need 27 Layer Cake squares that will be used for the stars (made up of half square triangles) and rectangles you see in the block diagram below.

For my quilt, I chose the bolder prints for the stars/HSTs to make them pop (below, left), and the subtle, low-volume prints for the rectangles (below, right) so they would be a fun design element, but didn't distract from the stars.
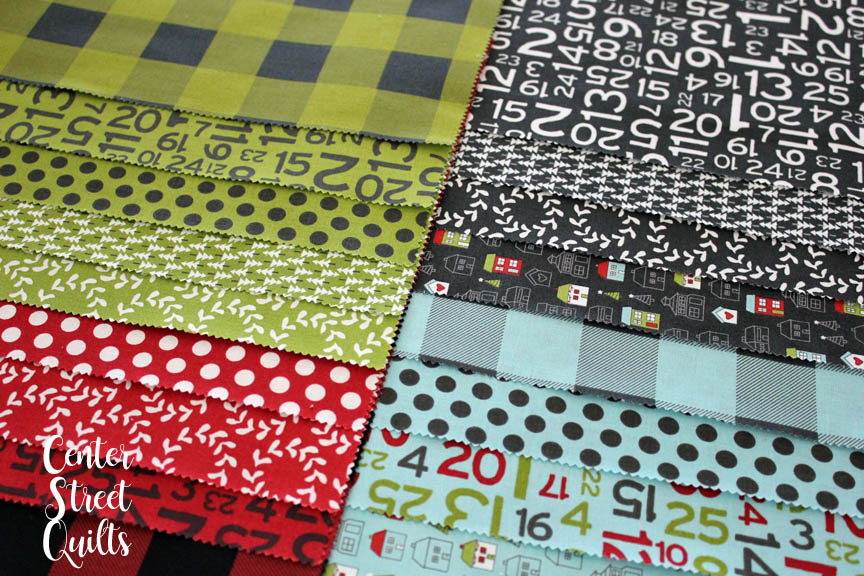
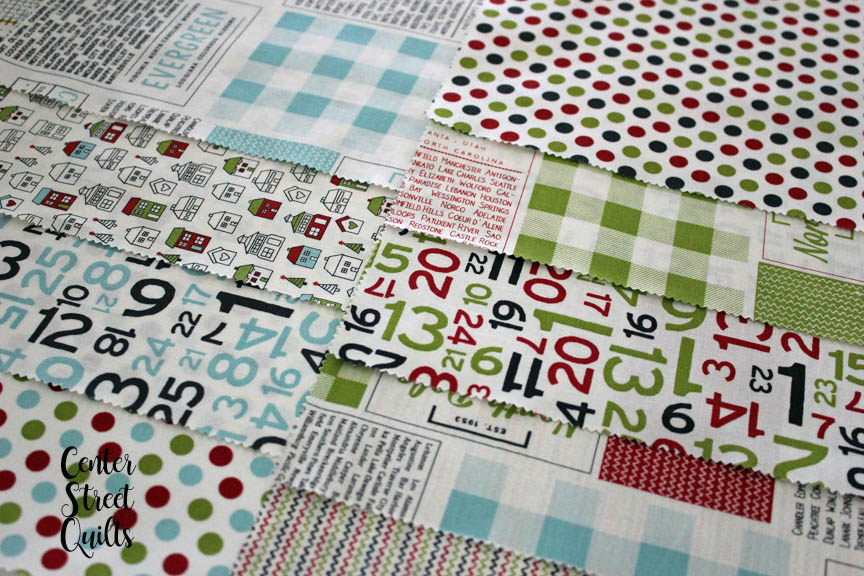
You'll need to choose (18) Layer Cake squares for the stars/HSTs and (9) Layer Cake squares for the rectangles (again, 27 Layer Cake squares total). The remainder of the squares can be used for another project or you can save them for a fun, scrappy binding!
Cutting Fabric:
You can set the (18) Layer Cake squares you chose for the stars/HSTs to the side because we won't be cutting into those quite yet.
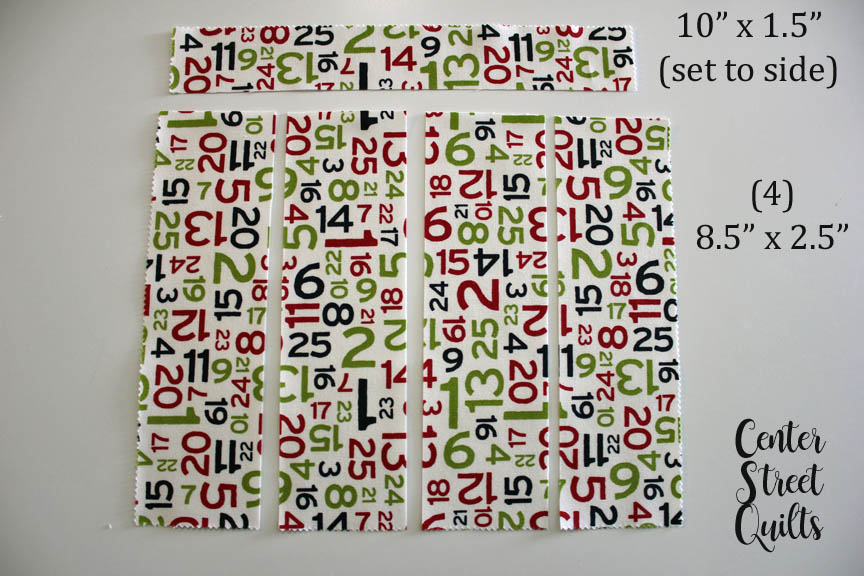
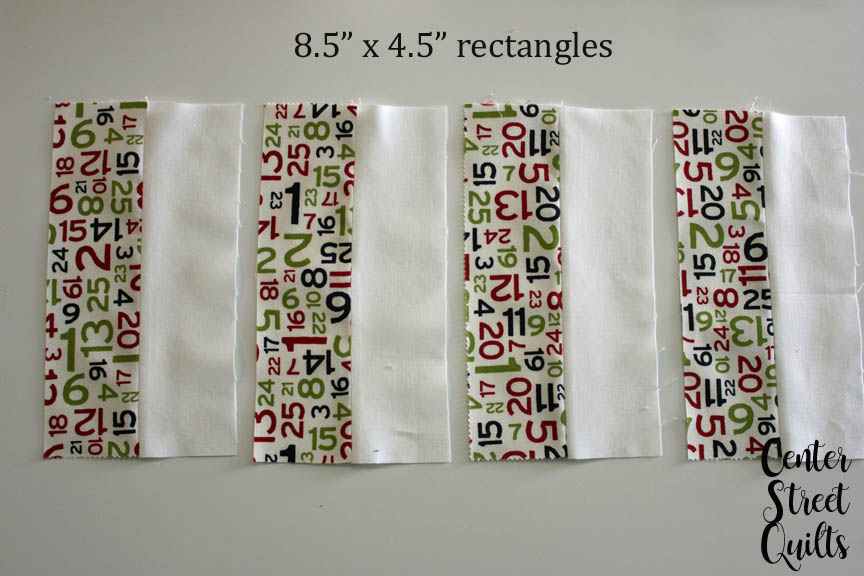
Take the (9) Layer Cake squares you chose for the rectangles and cut a 1 1/2” strip off of the top of each of them—making each 10” x 8.5.” Put the small 1 1/2” strip to the side and subcut the larger piece into (4) 8.5” x 2.5” strips. From the (9) layer cake squares you started out with, you should end up with (36) 8.5” x 2.5” rectangles.
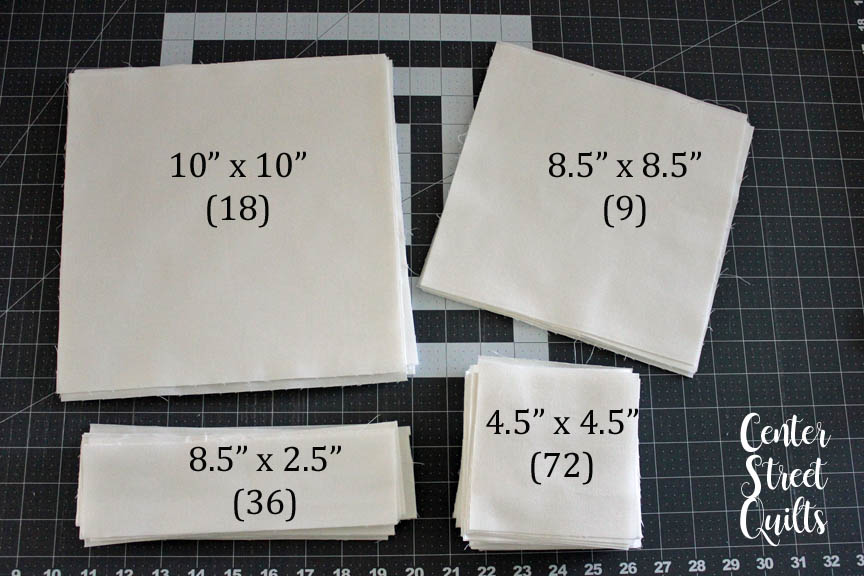
Now we need to cut out our background fabric. The cutting instructions assume that the width of your fabric is 42.” From our background fabric, we'll be cutting:
(18) 10” x 10” squares
(9) 8.5” x 8.5” squares
(36) 8.5” x 2.5” rectangles and
(72) 4.5” x 4.5” squares
Cut (5) strips that are 10” x width of fabric (WOF). From those strips, cut (18) 10” x 10” squares. You should have about half of one of the strips of fabric left over—from that piece cut (2) 8.5” x 8.5” squares.
Cut (4) strips that are 8.5” x WOF. From these strips, cut out (7) 8.5” x 8.5” squares first. From the remainder of the strips, cut (36) 8.5” x 2.5” rectangles.
Cut (8) strips that are 4.5” x WOF. Subcut each strip into (9) 4.5” x 4.5” squares for a total of (72) 4.5” x 4.5” squares.
Sewing:
Use a 1/4” seam throughout.
We'll start by sewing the (36) 8.5” x 2.5” layer cake rectangles to the (36) 8.5” x 2.5” background rectangles. Pair up each printed rectangle with a background rectangle, place right sides together, and sew along one of the long sides (one of the 8.5” sides). Open and press. After sewing each pair together, you should have (36) 8.5” x 4.5” rectangles.
Now, we'll take the (18) 10” x 10” Layer Cake squares you chose for the stars and the (18) 10” x 10” background squares to make all of our half-square triangles. We're going to use a technique to quickly make (8) half square triangles (HSTs) from each of these pairs. Follow the diagram below to mark, sew, then cut the squares.
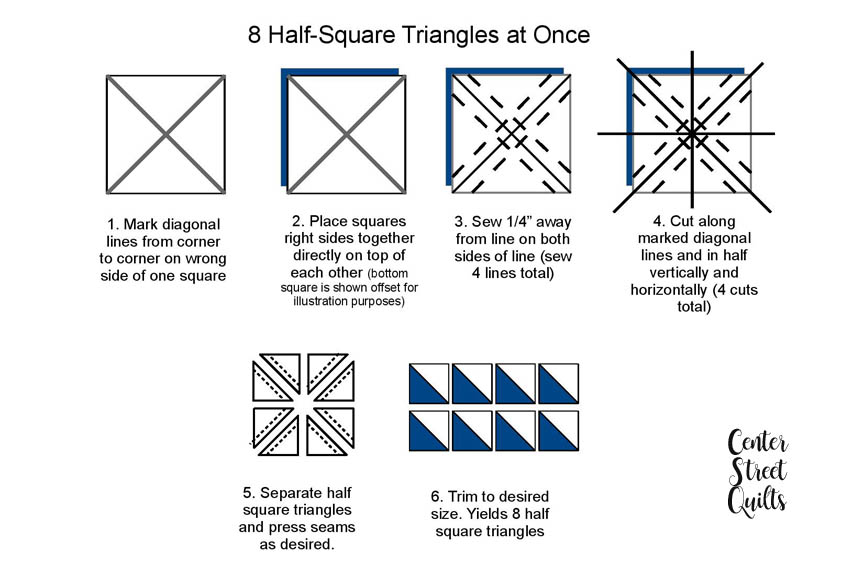
The last two steps are also shown in the photographs below. Remember, you'll be sewing four lines (1/4" away on either side of the diagonals) and cutting four lines (one on each diagonal, plus in half vertically and horizontally).


After pressing, trim each of the half-square triangles to 4.5” x 4.5.” They should only be slightly bigger than that, but you'll need to trim them to get accurate seams when you sew the blocks together. You should have (8) HSTs from each of the Layer Cake Squares, or (144) 4.5” x 4.5” HSTs total.
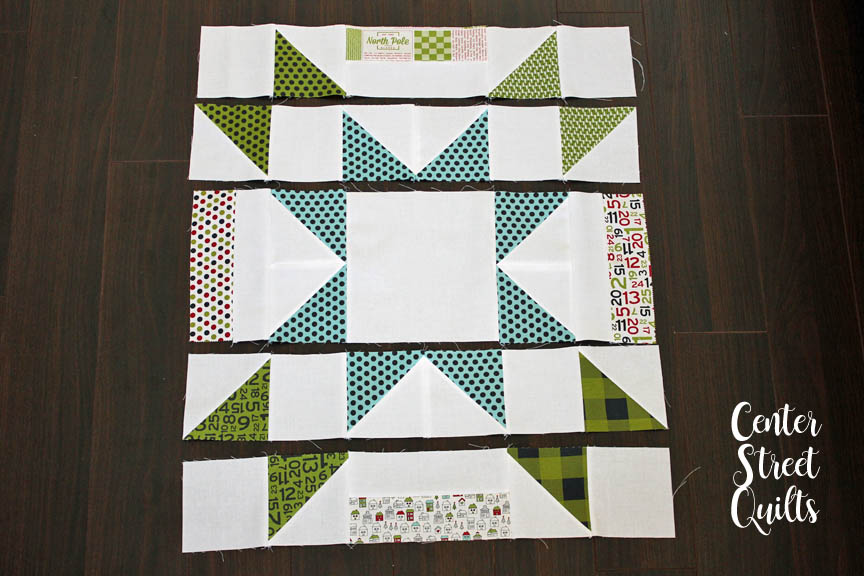
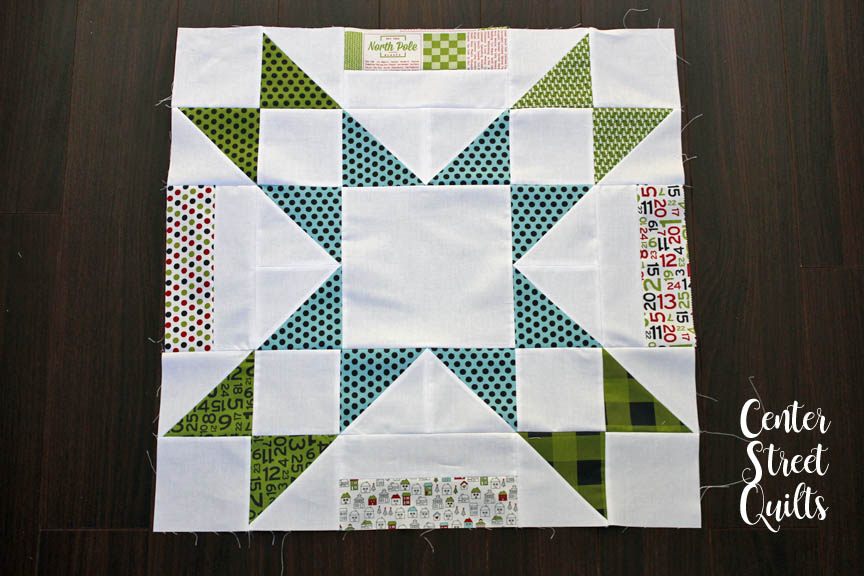
Now we're ready to sew our first block together! Assemble the pieces for a block according to the image below. You'll need one 8.5” x 8.5” background square in the center, (8) 4.5” x 4.5” background squares, (16) HSTs, and (4) of the rectangle units for each block.
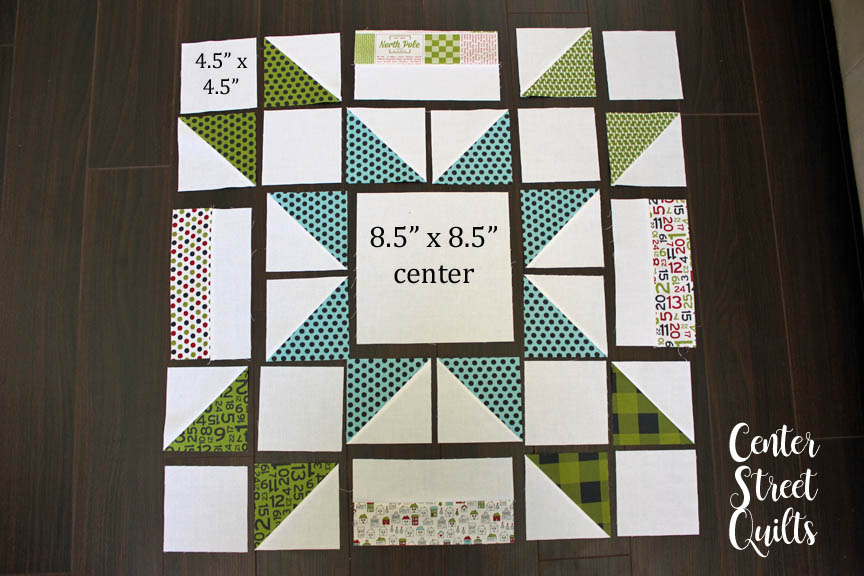
The HSTs on the outside corners will come together to make a secondary star with the adjacent blocks. You can plan ahead to make sure those stars are color-coordinated, or place the HSTs random for a scrappy look.
I sewed my blocks together by rows, then pressed the seams before sewing a row to another row (see photos below).

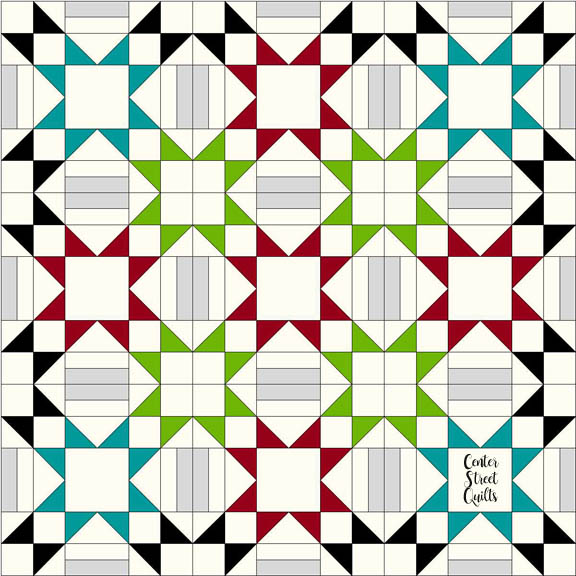
Assemble each of the nine blocks and then sew them together in a 3 x 3 grid. You can see how the HSTs on the outer corners of each block come together to make another star (in green below).
Your quilt top is now ready to be quilted and bound! I decided to utilize the extra Layer Cake squares that I didn't use for the quilt top and do a super scrappy binding. If you'd like to do that too, you'll just need to cut ten of your extra Layer Cake squares into 2.5” strips, then join together like you would with regular binding. It takes a little longer to make a scrappy binding, but results in such a fun finishing touch.

![]()
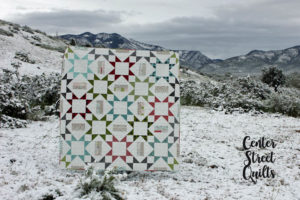
This quilt finishes at 72" x 72".
Thank you for following along with my Shining Bright pattern! The jumbo-sized blocks make a big impact, especially when using such fun fabric as Sweetwater's Hometown Christmas Edition. This pattern would also be darling as a baby quilt. Just make four blocks instead of two and you'll have a sweet 48” x 48” quilt for your favorite baby.
Please tag me on instagram @centerstreetquilts if you make a Shining Bright quilt. I'd love to see your creation!
Kristina Brinkerhoff
![]()
Posted in:
Comments